Attached files
| file | filename |
|---|---|
| S-1/A - S-1/A - ENTELLUS MEDICAL INC | d786085ds1a.htm |
| EX-10.4 - EX-10.4 - ENTELLUS MEDICAL INC | d786085dex104.htm |
| EX-10.5 - EX-10.5 - ENTELLUS MEDICAL INC | d786085dex105.htm |
| EX-10.13 - EX-10.13 - ENTELLUS MEDICAL INC | d786085dex1013.htm |
| EX-10.4(B) - EX-10.4(B) - ENTELLUS MEDICAL INC | d786085dex104b.htm |
| EX-4.1 - EX-4.1 - ENTELLUS MEDICAL INC | d786085dex41.htm |
| EX-10.1(B) - EX-10.1(B) - ENTELLUS MEDICAL INC | d786085dex101b.htm |
| EX-10.11 - EX-10.11 - ENTELLUS MEDICAL INC | d786085dex1011.htm |
| EX-3.7 - EX-3.7 - ENTELLUS MEDICAL INC | d786085dex37.htm |
| EX-5.1 - EX-5.1 - ENTELLUS MEDICAL INC | d786085dex51.htm |
| EX-23.1 - EX-23.1 - ENTELLUS MEDICAL INC | d786085dex231.htm |
| EX-10.10 - EX-10.10 - ENTELLUS MEDICAL INC | d786085dex1010.htm |
| EX-10.4(A) - EX-10.4(A) - ENTELLUS MEDICAL INC | d786085dex104a.htm |
| EX-10.12 - EX-10.12 - ENTELLUS MEDICAL INC | d786085dex1012.htm |
Exhibit 10.7
[***] CERTAIN INFORMATION IN THIS DOCUMENT HAS BEEN OMITTED AND FILED SEPARATELY WITH THE SECURITIES AND EXCHANGE COMMISSION. CONFIDENTIAL TREATMENT HAS BEEN REQUESTED WITH RESPECT TO THE OMITTED PORTION.
CONFIDENTIAL SETTLEMENT AGREEMENT AND NON-EXCLUSIVE PATENT
LICENSE AGREEMENT
This Confidential Settlement Agreement and Non-Exclusive Patent license Agreement (“Agreement”), effective as of this 17 day of February, 2011 (“Effective Date”), by and between the following parties:
a) Acclarent, Inc., a corporation organized under the laws of the State of Delaware, having its principal office at 1525-B O’Brien Drive Menlo Park, CA 94025 (“Acclarent”); and
b) Entellus Medical, Inc., a corporation organized under the laws of the State of Delaware, having its principal office at 6705 Wedgwood Court North, Maple Grove, MN 55311 (“Entellus”).
ARTICLE 1—BACKGROUND
1.1 Acclarent asserts that Entellus’ currently marketed FinESS and XprESS products each infringe one or more of issued U.S. Patent Nos. 7,740,642; 7,645,272; 7,654,997; 7,717,933; and 7,753,929 covering instruments and methods for treating sinus disorders, which are owned by Acclarent.
1.2 Acclarent filed an action against Entellus in the U.S. District Court for the Northern District of California on July 28, 2010 alleging such infringement (“Infringement Case”).
1.3 Entellus denies the allegations in the Infringement Case and has asserted that the Patents-in-Suit are not infringed, are invalid, and are unenforceable.
1.4 The parties wish to resolve their dispute and the pending litigation under the terms and conditions of this Agreement.
Therefore, in consideration of the mutual promises contained in this Agreement, the parties agree as follows:
ARTICLE 2—DEFINITIONS
The following terms, when used with initial capital letters, shall have the meanings set forth below.
2.1 “Affiliate” is any entity that directly or indirectly controls, is controlled by, or is under common control with either party, and for such purpose “control” shall mean the possession, direct or indirect, of the power to direct or cause the direction of the management and policies of the entity, whether through the ownership of voting securities, by contract or otherwise.
2.2 “Calendar Quarter” is the usual and customary calendar quarter, used for internal accounting purposes, of approximately three (3) months, in which each of the first two months consist of four weeks and the third month consists of five weeks.
2.3 “Covered Products” are the products specifically identified in Appendix A to this Agreement, and any future products embodying [***].
2.4 “Field” is the expansion of paranasal sinuses and sinus pathways.
2.5 “Licensed Patents” are U.S. Patent Nos. 7,740,642; 7,645,272; 7,654,997; 7,717,933; and 7,753,929 (the “Asserted Patents”). Licensed Patents shall also include any other counterparts of the Asserted Patents worldwide, as well as all continuations, continuations-in-part, divisions, renewals, reissues, and reexaminations of the Asserted Patents, and any other patent that has or will issue from any patent application that claims or lends any form of priority to the Asserted Patents, the practice of which is reasonably necessary for Entellus to make, have made, use, sell, offer to sell, import or otherwise dispose of a Covered Product. Furthermore, Licensed Patents shall also include each patent which Acclarent owns or is empowered to grant a license to Entellus prior to or during the term of this Agreement, the practice of which is reasonably necessary for Entellus to make, have made, use, sell, offer to sell, import or otherwise dispose of a Covered Product.
2.6 “Net Sales” is the revenue that Entellus or its Affiliates actually collect from the sale of Covered Products to an unaffiliated third party, less the following amounts: (i) discounts, including cash discounts, or rebates actually allowed or granted, (ii) credits or allowances actually granted upon claims or returns regardless of the party requesting the return, (iii) freight charges paid for delivery, and (iv) taxes or other governmental charges levied on or measured by the invoiced amount whether absorbed by the billing or the billed party. In the event that [***] (“Staple Products”), then Net Sales shall be calculated based on the net selling price of [***]. Further, Net Sales shall include any Staple Product that is [***].
2.7 “Regulatory Approval” is the clearance from a regulatory agency, such as those granted by the FDA under a 510(k) submission or a PMA submission, or any substantially equivalent foreign government clearance, to market and sell a Covered Product.
[***] CERTAIN INFORMATION IN THIS DOCUMENT HAS BEEN OMITTED AND FILED SEPARATELY WITH THE SECURITIES AND EXCHANGE COMMISSION. CONFIDENTIAL TREATMENT HAS BEEN REQUESTED WITH RESPECT TO THE OMITTED PORTION.
- 2 -
2. 8 “Royalty Generating Patents” are any patent of the Licensed Patents that generates a royalty obligation for Entellus to pay under this Agreement.
2.9 “Valid Claim” is a bona fide, unexpired issued claim in the Licensed Patents that has not been held invalid or unenforceable by a decision of a court or other governmental agency of competent jurisdiction, unappealable or unappealed within the time allowed for appeal, and that has not been admitted to be invalid by Acclarent or its successors or assigns through reissue or disclaimer.
ARTICLE 3—TERM
3.1 Unless otherwise terminated in accordance with the provisions of Article 14 herein, the term of this Agreement shall be from the Effective Date until the date upon which the last of the Licensed Patents expires or is abandoned.
ARTICLE 4—SETTLEMENT
4.1 The parties agree to dismiss the Infringement Case and all claims and counterclaims asserted therein. The parties shall execute the Stipulations attached hereto as Appendix C and shall file the executed Stipulations with the appropriate district court following execution of this Agreement. Each party shall [***], and shall execute any such other documents as may be necessary to secure the dismissal with prejudice as set forth in the applicable Stipulations.
ARTICLE 5—LICENSE GRANT
5.1 Subject to the terms and conditions of this Agreement, Acclarent grants Entellus a nonexclusive, worldwide license under the Licensed Patents to make, have made, use, sell, offer to sell, import or otherwise dispose of, the Covered Products for use in the Field. Entellus shall not manufacture for, have manufactured for, or sell Covered Products under labels or brand names other than its own respective labels and brand names, or in any way create a de facto sublicense, unpermitted assignment or private labeling arrangement with a third party. For sake of clarity, the license granted under this Article 5.1 is limited to Covered Products and does not extend to any Staple Products referred to in Article 2.6 above.
5.2 Entellus shall have the right to extend the licenses granted herein to any of its Affiliates, upon the terms and conditions of this Agreement, provided Entellus agrees in writing to be responsible for the performance by such Affiliates of all of Entellus’ obligations hereunder, including the payment of royalties set forth in Article 6.1 herein on Net Sales of the Covered
[***] CERTAIN INFORMATION IN THIS DOCUMENT HAS BEEN OMITTED AND FILED SEPARATELY WITH THE SECURITIES AND EXCHANGE COMMISSION. CONFIDENTIAL TREATMENT HAS BEEN REQUESTED WITH RESPECT TO THE OMITTED PORTION.
- 3 -
Products by the Affiliates to whom the licenses have been extended. Entellus shall not have the right to grant any sublicenses under this Agreement.
ARTICLE 6—PAYMENTS
6.1 Royalty Payments In further consideration for the license granted to Entellus under Article 5 herein, Entellus shall pay Acclarent on a quarterly basis pursuant to Article 8.1 below for the term of this Agreement
(a) from the Effective Date of this Agreement until September 30, 2022, royalty of [***] percent ([***] %) on Net Sales of Covered Products that are manufactured or sold in a country in which the manufacture, sale or use of the Covered Product would, but for the terms of this Agreement, infringe a Valid Claim of the Licensed Patents.
(b) from September 30, 2022 until the date upon which the last of the Licensed Patents expire or is abandoned, [***] percent ([***]%) on Net Sales of Covered Products that are manufactured or sold in a country in which the manufacture, sale or use of the Covered Product would, but for the terms of this Agreement, infringe a Valid Claim of the Licensed Patents.
No royalties shall be payable under this Article 6.1 on Net Sales of the Covered Products in conjunction with clinical tests or trials. Specifically, no royalties shall be payable on Net Sales of the Covered Products sold before obtaining Regulatory Approval. Furthermore, no multiple royalties shall be payable because a Covered Product is covered by more than one of the Licensed Patents.
Entellus stipulates that royalties will be payable under this Article 6.1 for the Net Sales of the products listed in Appendix A that are manufactured or sold in the United States, at least for so long as such products are sold for use or intended use in the same manner as of the Effective Date.
6.2 Within [***] days of the Effective Date of this Agreement, Entellus shall pay Acclarent a lump sum equal to royalties that would have been due to date under Article 6.1(a) above, had this Agreement been in effect as of July 28, 2010.
6.3 Minimum Royalty Payments Entellus shall not have any minimum royalty obligations under this Agreement. However, Entellus may [***]. Should the [***], then such [***]. In the event that [***] under this Agreement, then [***].
[***] CERTAIN INFORMATION IN THIS DOCUMENT HAS BEEN OMITTED AND FILED SEPARATELY WITH THE SECURITIES AND EXCHANGE COMMISSION. CONFIDENTIAL TREATMENT HAS BEEN REQUESTED WITH RESPECT TO THE OMITTED PORTION.
- 4 -
ARTICLE 7—ENTELLUS RECORD KEEPING AND REPORTS
7.1 Entellus shall keep accurate books and records of the Net Sales of Covered Products, and of all payments due Acclarent hereunder. Entellus shall deliver to Acclarent written reports of Net Sales of Covered Products during the preceding Calendar Quarter, on or before the [***] day following the end of each Calendar Quarter. Such report shall include a calculation of the royalty due and shall be accompanied by the monies due. The royalty payable on Net Sales of the Covered Products outside the U.S. shall be estimated for each Calendar Quarter, and adjusted at the end of each calendar year to reflect actual sales and the royalty payable thereon.
7.2 Acclarent shall have the right after [***] days advance written notice to Entellus, [***], to nominate an independent accountant acceptable to and approved by Entellus (which approval shall not be unreasonably withheld) who shall have access to Entellus’ records during reasonable business hours for the sole purpose of verifying the royalties payable as provided for in this Agreement for the preceding calendar year, but this right may not be exercised more than once in any calendar year. Acclarent shall solicit or receive only information relating solely to the accuracy of the royalty report and the royalty payments made according to this Agreement. Entellus shall be entitled to withhold approval of an accountant that Acclarent nominates unless the accountant shall agree to sign a confidentiality agreement with Entellus that obligates such accountant to hold the information it receives from Entellus in confidence, except for information necessary for disclosure to Acclarent to establish the accuracy of the royalty reports. If an audit made pursuant to this Article 7.2 above produces a discrepancy of greater than [***]%, then Acclarent shall have the right to re-audit upon demand and with [***] prior notice to Entellus [***], and Entellus shall bear the cost of the audit that produced such a discrepancy.
7.3 Acclarent shall retain in confidence, the results of all information received related to Net Sales of the Covered Products and any audit information. All such information received by Acclarent shall be disclosed solely to Acclarent’s President, Chief Financial Officer, finance staff at Acclarent or its Affiliates with royalty accounting responsibility, and internal and external counsel and financial personnel who shall use the information solely for financial auditing or reporting purposes or for remedying any failure to pay royalties due and shall not disclose it to any other person within Acclarent or its Affiliates, except as required in the normal course of reporting financial results, or as may otherwise be required by law.
ARTICLE 8—CURRENCY AND ROYALTY TRANSFER
8.1 Royalties based on sales in any country shall be paid in United States Dollars. The rate of exchange for such payments from sales in a foreign country shall be the official rate of exchange of the currency of the country from which royalties are payable as quoted by the Wall Street Journal, New York Edition, on the last business day of the Calendar Quarter
[***] CERTAIN INFORMATION IN THIS DOCUMENT HAS BEEN OMITTED AND FILED SEPARATELY WITH THE SECURITIES AND EXCHANGE COMMISSION. CONFIDENTIAL TREATMENT HAS BEEN REQUESTED WITH RESPECT TO THE OMITTED PORTION.
- 5 -
for which the royalties are payable. The payment of royalties shall be made payable to Acclarent and sent to the address set forth for Acclarent in Article 15.3.
8.2 If a foreign government prohibits the transfer of royalties based on sales in foreign countries out of a particular foreign country, Entellus has the right to place Acclarent’s royalties in an independent bank account in the name of Acclarent and under the complete control of Acclarent, provided that Entellus informs Acclarent of the name of the bank, the bank account number and the amount of money deposited therein. After Acclarent has been so notified, those monies will be considered completely controlled by Acclarent, and Entellus will not have any further responsibility or claim to those monies or that bank account. Acclarent shall cooperate with Entellus to establish such an account if requested by Entellus.
ARTICLE 9—MOST FAVORED LICENSEE
9.1 In the event that Acclarent grants a license to a third party under any of the Royalty Generating Patents that [***], then Acclarent shall notify Entellus of the [***] of such other license within [***] of completion of such Third Party License Agreement.
9.2 If the Third Party License Agreement does not [***], then Entellus shall have the right to [***] the Third Party License Agreement within [***] from the receipt of such notice from Acclarent.
9.3 If the Third Party License Agreement [***], then Entellus shall have the right to [***]. Acclarent shall notify Entellus within [***].
9.4 The provisions of this Article 9 shall not apply to any Third Party License Agreement that
| i) | [***]; |
| ii) | [***]; or |
| iii) | [***]. |
[***] CERTAIN INFORMATION IN THIS DOCUMENT HAS BEEN OMITTED AND FILED SEPARATELY WITH THE SECURITIES AND EXCHANGE COMMISSION. CONFIDENTIAL TREATMENT HAS BEEN REQUESTED WITH RESPECT TO THE OMITTED PORTION.
- 6 -
This Article 9 also shall not apply to licenses with any affiliate within the Johnson & Johnson family of companies.
ARTICLE 10—PATENT ENFORCEMENT. PROSECUTION AND MAINTENANCE
10.1 Acclarent is solely responsible but not obligated, within its sole discretion, for the enforcement of the Licensed Patents, and for the continued prosecution of pending patent applications within the Licensed Patents, and the issuance and maintenance of the Licensed Patents.
10.2 Notwithstanding Article 10.1 above, if Entellus becomes aware of any third-parties that may be infringing the Licensed Patents in the Field, then Entellus shall notify Acclarent in writing of such potential infringement within [***].
10.3 Upon request by Entellus, Acclarent shall inform Entellus of the status of any of the Licensed Patents.
ARTICLE 11—COVENANTS. WARRANTIES AND REPRESENTATIONS
11.1 Each party represents and warrants to the other party that (a) it has full right, power and authority to enter into and be bound by the terms and conditions of this Agreement, to transfer the rights and to carry out their respective obligations under this Agreement without the approval or consent of any other person, (b) the entering into of this Agreement, the transfer of rights and the carrying out of their respective obligations under this Agreement is not prohibited, restricted or otherwise limited by any contract, agreement or understanding entered into by such party, or by which such party is bound, with any other person, including, without limitation, any governmental authority, (c) there is no contract, agreement or understanding entered into by a party, or by which such party is bound, which if enforced, terminated or modified, would be in derogation of, contrary to, or adversely affect the rights acquired or to be acquired hereunder, and (d) there is no action or investigation pending or currently threatened against such party which, if adversely determined, would restrict or limit such party’s right to enter into this Agreement.
11.2 Acclarent does not warrant, in particular, the validity of the Licensed Patents, nor the freedom to exploit the inventions or technical solutions described in the Licensed Patents.
11.3 Acclarent expressly warrants and represents that a) it owns all of the right, title and interest in and to the Licensed Patents; b) it is empowered to grant the licenses granted herein; c) it has no outstanding encumbrances or agreements, including any agreements with academic institutions, universities, or third party employers, whether written, oral or implied, which would be inconsistent with the licenses granted herein.
[***] CERTAIN INFORMATION IN THIS DOCUMENT HAS BEEN OMITTED AND FILED SEPARATELY WITH THE SECURITIES AND EXCHANGE COMMISSION. CONFIDENTIAL TREATMENT HAS BEEN REQUESTED WITH RESPECT TO THE OMITTED PORTION.
- 7 -
11.4 Acclarent covenants not to sue Entellus for infringement of any Licensed Patent in connection with Entellus’ sale, marketing, use, import or export of any Covered Product in the Field.
11.5 Entellus its Affiliates, successors and assigns covenant that they will not attack the validity or enforceability of the Licensed Patents in any manner and by any means, including litigation and/or reexamination, and that they will not assist any third party in doing the same. Notwithstanding the foregoing, if [***]. For sake of clarity, Entellus shall [***] under this Agreement.
11.6 Notwithstanding the foregoing, nothing in this Agreement shall preclude Entellus from raising any defenses in a patent infringement litigation brought by Acclarent against Entellus.
11.7 Entellus expressly agrees to provide Acclarent with [***].
ARTICLE 12—TAXES
12.1 Entellus will make all payments to Acclarent under this Agreement without deduction or withholding for taxes except to the extent that any such deduction or withholding is required by law in effect at the time of payment.
12.2 Any tax required to be withheld on amounts payable under this Agreement will promptly be paid [***] to the appropriate governmental authority, and [***] of such tax. Any such tax required to be withheld will be [***].
ARTICLE 13—MARKING
13.1 For all Covered Products, at the request of Acclarent, Entellus shall mark the IFUs, packaging and promotional materials (e.g. FDA labeling) with the Licensed Patents in a commercially reasonable manner.
ARTICLE 14—TERMINATION
14.1 Acclarent may terminate this Agreement upon sixty (60) days written notice to Entellus for any material breach or default by Entellus. Such termination shall become effective
[***] CERTAIN INFORMATION IN THIS DOCUMENT HAS BEEN OMITTED AND FILED SEPARATELY WITH THE SECURITIES AND EXCHANGE COMMISSION. CONFIDENTIAL TREATMENT HAS BEEN REQUESTED WITH RESPECT TO THE OMITTED PORTION.
- 8 -
at the end of the sixty (60) day period unless during such period Entellus cures such breach or default. Notwithstanding the preceding sentence, from the date either party notifies the other party that it wishes to commence a proceeding in accordance with the dispute resolution procedures set forth in Appendix B, until the date such proceeding has been concluded, the running of the time period referred to in this Article 14.1 for curing a breach shall be suspended with respect to the subject matter of the dispute, claim or controversy.
14.2 If all claims of the Licensed Patents reading on the use or sale of a Covered Product are found to be invalid or unenforceable under a final decision by a court or other governmental agency of competent jurisdiction, then Entellus’ royalty obligations for that Covered Product shall terminate effective as of the date of such final decision.
ARTICLE 15—MISCELLANEOUS
15.1 Marketing Obligations Acclarent acknowledges that Entellus [***], and therefore, shall [***].
15.2 Confidentiality and Publicity Neither party shall disclose the financial terms of this Agreement to an unaffiliated third party without the prior written approval of the other party, except for legal, financial, accounting or other similar advisors who have a need to know any of such terms and agrees to keep them confidential. The confidentiality obligations of the parties under this Article 15.2 shall not extend to disclosure which is required by any governmental agency or regulatory body, court order or otherwise required by law, or to the extent required to preserve, exercise or enforce rights under this Agreement. Furthermore, neither party will originate any news release, or other public announcement, written or oral, whether to the public press, to stockholders, or otherwise, relating to this Agreement, to any amendment hereto or to performance hereunder or the existence of an arrangement between the parties without the prior written approval of the other party. An Entellus Press Release related to the completion of this agreement is in Appendix D and is approved with the signing of this agreement. Notwithstanding the foregoing, Entellus shall have the right to disclose the terms of this Agreement to current shareholders and in connection with bona fide fund raising or sale of the company stock provided that such disclosure is no broader than necessary to satisfy such purposes, and is made under a confidentiality agreement including substantially similar confidentiality terms as this Article 15.2. Notwithstanding the foregoing, for the sole purpose of settling a third party infringement action involving the Licensed Patents, or settling with a third party accused of infringing the Licensed Patents, Acclarent shall have the right to disclose the existence of this Agreement and the royalty rate set forth herein.
15.3 Notices All notices hereunder shall be in writing and shall be deemed to have been duly given if delivered personally, one day after delivery to a nationally recognized overnight delivery service, charges prepaid, three days after sent by registered or certified mail, postage prepaid, or when receipt is confirmed if by, facsimile or other telegraphic means:
[***] CERTAIN INFORMATION IN THIS DOCUMENT HAS BEEN OMITTED AND FILED SEPARATELY WITH THE SECURITIES AND EXCHANGE COMMISSION. CONFIDENTIAL TREATMENT HAS BEEN REQUESTED WITH RESPECT TO THE OMITTED PORTION.
- 9 -
In the case of Acclarent:
President
Acclarent, Inc.
1525-B O’Brien Drive
Menlo Park, CA 94025
With a copy to:
Chief Patent Counsel
Johnson & Johnson
One Johnson & Johnson Plaza
New Brunswick, New Jersey 08933
In the case of Entellus:
President and Chief Executive Officer
Entellus Medical, Inc.
6705 Wedgwood Court North
Maple Grove, MN 55311
With a copy to:
Director, Intellectual Property
Entellus Medical, Inc.
6705 Wedgwood Court North
Maple Grove, MN 55311
Such addresses may be altered by written notice given in accordance with this Article 15.3.
15.4 Assignment Either party may assign this Agreement or any rights and obligations contemplated herein to an Affiliate of that party or to a company acquiring substantially all of the assets of that party to which this Agreement relates, without the consent of the other party, upon giving written notice thereof to the other party. Acclarent may assign its right to receive payments under this Agreement to any third party, upon giving written notice of such assignment to Entellus. Any such assignment shall be subject to the terms of this Agreement. In all other instances, neither party shall assign this Agreement, any portion thereof or any rights granted hereunder without the prior written consent of the other party. Subject to the foregoing, this Agreement shall bind and inure to the benefit of the respective parties hereto, and their respective heirs, officers, directors, representatives, agents, successors, assigns, distributors, suppliers, vendors and customers.
- 10 -
15.5 Force Majeure Any delays in or failures of performance by either party under this Agreement shall not be considered a breach of this Agreement if and to the extent caused by occurrences beyond the reasonable control of the party affected, including but not limited to: acts of God; acts, regulations or laws of any government; strikes or other concerted acts of workers; fires; floods; explosions; riots; wars; rebellions; and sabotage; and any time for performance hereunder shall be extended by the actual time of delay caused by such occurrence.
15.6 Relationship of Parties The parties hereto are entering into this Agreement as independent contractors, and nothing herein is intended or shall be construed to create between the parties a relationship of principal and agent, partners, joint venturers or employer and employee. Neither party shall hold itself out to others or seek to bind or commit the other party in any manner inconsistent with the foregoing provisions of this Article.
15.7 Dispute Resolution The parties agree to be bound by the dispute resolution provisions set forth in Appendix B attached hereto.
15.8 Severability If any provision of this Agreement is held to be illegal, invalid, or unenforceable under any applicable present or future law, and if the rights or obligations of any party hereto under this Agreement will not be materially and adversely affected thereby, then (a) such provision will be fully severable; (b) this Agreement will be construed and enforced as if such illegal, invalid, or unenforceable provision had never been a part hereof; (c) the remaining provisions of this Agreement will remain in full force and effect and will not be affected by the illegal, invalid, or unenforceable provision or by its severance herefrom; and (d) in lieu of such illegal, invalid, or unenforceable provision, the parties hereto will negotiate in good faith and add as part of this Agreement a valid and enforceable provision as similar in substance to such illegal, invalid, or unenforceable provision as may be possible.
15.9 Integration It is the mutual desire and intent of the parties to provide certainty as to their future rights and remedies against each other by defining the extent of their mutual undertakings as provided herein. The parties have in this Agreement incorporated all representations, warranties, covenants, commitments and understandings on which they have relied in entering into this Agreement and, except as provided for herein, neither party has made any covenant or other commitment to the other concerning its future action. Accordingly, this Agreement constitutes the entire agreement and understanding between the parties with respect to the matters contained herein, and there are no prior oral or written promises, representations, conditions, provisions or terms related thereto other than those set forth in this Agreement. The parties may from time to time during the term of this Agreement modify any of its provisions by mutual agreement in writing.
15.10 Headings The inclusion of headings in this Agreement is for convenience only and shall not affect the construction or interpretation hereof.
15.11 Governing Law This Agreement shall be governed and interpreted under the laws of the State of New Jersey, without regard for conflicts of law.
- 11 -
This Agreement is signed below by duly authorized representatives of Acclarent and the Entellus, respectively.
| Acclarent, Inc. | Entellus Medical, Inc. | |||||||
| By: | /s/ Bill Facteau |
By: | /s/ Brian Farley | |||||
| Bill Facteau, President | Brian Farley, President and CEO | |||||||
| Date: | 2/15/2011 | Date: 2-17-11 | ||||||
- 12 -
APPENDIX A
Covered Products
The following Covered Products listed in this Appendix A, and any respective components, are licensed under Section 5 of this Agreement whether sold individually or pre-packaged in kits.
(1) The FinESS® Sinus Treatment Product Gen 2 (“Gen 2 FinESS®”) which is described in the attached Instructions for Use dated July 2010 (Rev D) (Exhibit 1 to this Appendix A), and as currently sold under Entellus catalog number BC-500 as a kit that includes the following components:
Canine fossa micro trocar
Canine fossa access sheath with side cutting
Cannula with lumens for endoscope and balloon
Balloon dilation catheter
Inflation device without gauge
Extension tubing
(2) The Entellus Endoscope bundle currently sold by Entellus for use with Gen 2 FinESS® under Entellus catalog number ES-100b, which is described in the attached Instructions for Use dated January 2011 (Exhibit 2 to this Appendix A), which includes a flexible endoscope with fixed focus.
(3) The Entellus flexible endoscope with a protective sheath (which is illustrated in the photograph attached as Exhibit 3 to this Appendix A) and the Entellus flexible endoscope with a focus ring (which is illustrated in the photograph attached as Exhibit 4 to this Appendix A), both of which are currently 510(k) cleared or exempt, but not currently marketed.
(4) The currently existing canine fossa access sheath without side cutting for use with a FinESS® product, which is 510(k) cleared or exempt, but not currently marketed.
(5) The FinESS® Gen 3 (“Gen3 FinESS®”) product for which 510(k) clearance is currently pending, and that includes the components shown in the attached draft Instructions for Use dated May 2010 (rev C) (Exhibit 5 to this Appendix A) and is identified by Entellus catalog number BC-700.
(6) The FinESS® Gen 3 endoscope (“Gen3 Scope”) product for which 510(k) clearance is currently pending and which is described in the attached draft Instructions for Use dated January 13, 2011 (Exhibit 6 to this Appendix A).
(7) A sterilization tray for use with the Gen3 Scope.
(8) The XprESS™ Sinus Treatment Product (“XprESS™”) which is described in the attached Instructions for Use dated October 2010 (Exhibit 7 to this Appendix A), and as currently sold under Entellus catalog number JD-100.
- 13 -
(9) The XprESS™ Sinus Treatment Product with semi-rigid tip (“Semi-Rigid XprESS™”) that differs from XprESS™ only in having a semi-rigid tip rather than a shapeable tip.
(10) The FinESS® Sinus Treatment Product Gen 1 (“Gen 1 FinESS®”) which is described in the attached Instructions for Use dated March 2010 (Exhibit 8 to this Appendix A), and was or is sold under Entellus catalog number BC5OO as a kit that includes the following components:
Canine fossa micro trocar
Canine fossa access sheath with side cutting
Cannula with lumens for endoscope and balloon
Balloon dilation catheter
Inflation device with gauge
Extension tubing
- 14 -
APPENDIX B—DISPUTE RESOLUTION
ARBITRATION
| a. | Any dispute, claim or controversy arising from or related in any way to this Agreement or the interpretation, application, breach, termination or validity thereof, including any claim of inducement of this Agreement by fraud or otherwise, will be submitted for resolution to arbitration pursuant to the rules then pertaining of the International Institute for Conflict Prevention and Resolution for Non-Administered Arbitration (available at http://www.cpradr.org/arb-intro.asp?M=9.3), or successor (“CPR”), except where those rules conflict with these provisions, in which case these provisions control. The arbitration will be held in New Brunswick, New Jersey. |
| b. | The panel shall consist of three arbitrators chosen from the CPR Panels of Distinguished Neutrals (or, by agreement, from another provider of arbitrators) each of whom is a lawyer with at least 15 years experience practicing patent law and with a law firm or corporate law department of over 25 lawyers or who was a judge of a court of general jurisdiction. In the event the aggregate damages sought by the claimant are stated to be less than $5 million, and the aggregate damages sought by the counterclaimant are stated to be less than $5 million, and neither side seeks equitable relief, then a single arbitrator shall be chosen, having the same qualifications and experience specified above. Each arbitrator shall be impartial and independent of the parties and, for at least a period of ten years prior to the effective date of this agreement, shall not have been employed by, or worked for a law firm that is or has been retained by either party or by any affiliate of either party. Each arbitrator shall abide by the Code of Ethics for Arbitrators in Commercial Disputes (available at http://www.adr.org/EthicsAndStandards). |
| c. | The parties agree to cooperate (1) to attempt to select the arbitrator(s) by agreement within 45 days of initiation of the arbitration, including jointly interviewing the final candidates, (2) to meet with the arbitrator(s) within 45 days of selection and (3) to agree at that meeting or before upon procedures for discovery and as to the conduct of the hearing which will result in the hearing being concluded within no more than nine (9) months after selection of the arbitrator(s) and in the award being rendered within 60 days of the conclusion of the hearings, or of any post-hearing briefing, which briefing will be completed by both sides within 45 days after the conclusion of the hearings. |
| d. | In the event the parties cannot agree upon selection of the arbitrator(s), the CPR will select arbitrator(s) as follows: CPR shall provide the parties with a list of no less than 25 proposed arbitrators (15 if a single arbitrator is to be selected) having the credentials referenced above. Within 25 days of receiving such list, the parties shall rank at least 65% of the proposed arbitrators on the initial CPR list, after exercising cause challenges. The parties may then interview the five candidates (three if a single arbitrator is to be selected) with the highest combined rankings for no more than one hour each and, following the interviews, may exercise one peremptory challenge each. The panel will consist of the remaining three candidates (or one, if one arbitrator is to be selected) with the highest combined rankings. In the event these procedures fail to result in selection of the required number of arbitrators, CPR shall select the appropriate number of arbitrators from among the members of the various CPR Panels of Distinguished Neutrals, allowing each side challenges for cause and three peremptory challenges each. |
| e. | In the event the parties cannot agree upon procedures for discovery and conduct of the hearing meeting the schedule set forth in paragraph c above, then the arbitrator(s) shall set dates for the hearing, any post-hearing briefing, and the issuance of the award in accord with the paragraph c schedule. The arbitrator(s) shall provide for discovery according to those time limits, giving recognition to the understanding of the parties that they contemplate reasonable discovery, including document demands and depositions, but that such discovery be limited so that the paragraph c schedule may be met without difficulty. In no event will the arbitrator(s), absent agreement of the parties, allow more than a total of ten days for the hearing or permit either side to obtain more than a total of 40 hours of deposition testimony from all witnesses, including both fact and expert witnesses, or serve more than 20 individual requests for documents, including subparts, or 20 individual requests for admission or interrogatories, including subparts. Multiple hearing days will be scheduled consecutively to the greatest extent possible. |
| f. | The arbitrator(s) must render their award by application of the substantive law of New Jersey and are not free to apply “amiable compositeur” or “natural justice and equity.” The arbitrator(s) shall render a written opinion setting forth findings of fact and conclusions of law with the reasons therefor stated. A transcript of the evidence adduced at the hearing shall be made and shall, upon request, be made available to either party. The arbitrator(s) shall have power to exclude evidence on grounds of hearsay, prejudice beyond its probative value, redundancy, or irrelevance and no award shall be overturned by reason of such ruling on evidence. To the extent possible, the arbitration hearings and award will be maintained in confidence. |
| g. | In the event the panel’s award exceeds $5 million in monetary damages or includes or consists of equitable relief, or rejects a claim in excess of that amount or for that relief, then the losing party may obtain review of the arbitrators’ award or decision by a single appellate arbitrator (the “Appeal Arbitrator”) selected from the CPR Panels of Distinguished Neutrals by agreement or, failing agreement within seven working days, pursuant to the selection procedures specified in paragraph d above. If CPR cannot provide such services, the parties will together select another provider of arbitration services that can. No Appeal Arbitrator shall |
- 15 -
| be selected unless he or she can commit to rendering a decision within forty-five days following oral argument as provided in paragraph h. Any such review must be initiated within thirty (30) days following the rendering of the award referenced in f above. |
| h. | The Appeal Arbitrator will make the same review of the arbitration panel’s ruling and its bases that the U.S. Court of Appeals of the Circuit where the arbitration hearings are held would make of findings of fact and conclusions of law rendered by a district court after a bench trial and then modify, vacate or affirm the arbitration panel’s award or decision accordingly, or remand to the panel for further proceedings. The Appeal Arbitrator will consider only the arbitration panel’s findings of fact and conclusions of law, pertinent portions of the hearing transcript and evidentiary record as submitted by the parties, opening and reply briefs of the party pursuing the review, and the answering brief of the opposing party, plus a total of no more than four (4) hours of oral argument evenly divided between the parties. The party seeking review must submit its opening brief and any reply brief within seventy-five (75) and one hundred thirty (130) days, respectively, following the date of the award under review, whereas the opposing party must submit its responsive brief within one hundred ten (110) days of that date. Oral argument shall take place within five (5) months after the date of the award under review, and the Appeal Arbitrator shall render a decision within forty-five (45) days following oral argument. That decision will be final and not subject to further review, except pursuant to the Federal Arbitration Act. |
| i. | The parties consent to the jurisdiction of the Federal District Court for the district in which the arbitration is held for the enforcement of these provisions and the entry of judgment on any award rendered hereunder (including after review by the Appeal Arbitrator where such an appeal is pursued). Should such court for any reason lack jurisdiction, any court with jurisdiction shall act in the same fashion. |
| j. | Each party has the right before or, if the arbitrator(s) cannot hear the matter within an acceptable period, during the arbitration to seek and obtain from the appropriate court provisional remedies such as attachment, preliminary injunction, replevin, etc. to avoid irreparable harm, maintain the status quo, or preserve the subject matter of the arbitration. |
| k. | EACH PARTY HERETO WAIVES ITS RIGHT TO TRIAL OF ANY ISSUE BY JURY. |
| l. | EACH PARTY HERETO WAIVES ANY CLAIM TO PUNITIVE, EXEMPLARY OR MULTIPLIED DAMAGES FROM THE OTHER. |
| m. | EACH PARTY HERETO WAIVES ANY CLAIM OF CONSEQUENTIAL DAMAGES FROM THE OTHER. |
| n. | EACH PARTY HERETO WAIVES ANY CLAIM FOR ATTORNEYS’ FEES AND COSTS AND PREJUDGMENT INTEREST FROM THE OTHER. |
MEDIATION
| a. | Any dispute, controversy or claim arising out of or related to this agreement, or the interpretation, application, breach, termination or validity thereof, including any claim of inducement by fraud or otherwise, which claim would, but for this provision, be submitted to arbitration shall, before submission to arbitration, first be mediated through non-binding mediation in accordance with The CPR Mediation Procedure then in effect of the International Institute for Conflict Prevention and Resolution (CPR) available at www.cpradr.org/m_proced.htm, except where that procedure conflicts with these provisions, in which case these provisions control. The mediation shall be conducted in New Brunswick, New Jersey and shall be attended by a senior executive with authority to resolve the dispute from each of the operating companies that are parties. |
| b. | The mediator shall be neutral, independent, disinterested and shall be selected from a professional mediation firm such as JAMS or CPR. |
| c. | The parties shall promptly confer in an effort to select a mediator by agreement. In the absence of such an agreement within 10 days of initiation of the mediation, the mediator shall be selected by CPR as follows: CPR shall provide the parties with a list of at least 15 names from the CPR Panels of Distinguished Neutrals. Each party shall exercise challenges for cause, two peremptory challenges, and rank the remaining candidates within 5 working days of receiving the CPR list. The parties may together interview the three top-ranked candidates for no more than one hour each and, after the interviews, may each exercise one peremptory challenge. The mediator shall be the remaining candidate with the highest aggregate ranking. |
| d. | The mediator shall confer with the parties to design procedures to conclude the mediation within no more than 45 days after initiation. Under no circumstances may the commencement of arbitration under this Appendix B be delayed more than 45 days by the mediation process specified herein absent contrary agreement of the parties. |
- 16 -
| e. | Each party agrees not to use the period or pendency of the mediation to disadvantage the other party procedurally or otherwise. No statements made by either side during the mediation may be used by the other or referred to during any subsequent proceedings. |
| f. | Each party bas the right to pursue provisional relief from any court, such as attachment, preliminary injunction, replevin, etc., to avoid irreparable harm, maintain the status quo, or preserve the subject matter of the arbitration, even though mediation has not been commenced or completed. |
- 17 -
APPENDIX C
STIPULATIONS
- 18 -
RICHARD GOETZ (S.B. #115666)
O’MELVENY & MYERS LLP
400 South Hope Street
Los Angeles, CA 90071-2899
| Telephone: | (213) 430-6000 | |
| Facsimile: | (213) 430-6407 | |
| E-Mail: | rgoetz@omm.com |
ROBERTA VESPREMI (S.B. #225067)
O’MELVENY & MYERS LLP
2765 Sand Hill Road
Menlo Park, CA 94025
| Telephone: | (650) 473-2600 | |
| Facsimile: | (650) 473-2601 | |
| E-Mail: | rvespremi@omm.com |
Attorneys for Plaintiff
ACCLARENT, INC.
UNITED STATES DISTRICT COURT
NORTHERN DISTRICT OF CALIFORNIA
SAN JOSE DIVISION
| ACCLARENT, INC., |
Case No. C-10-003311 EMC | |||
| Plaintiff, |
NOTICE OF DISMISSAL | |||
| v. |
||||
| ENTELLUS MEDICAL, INC., |
||||
| Defendant. |
||||
NOTICE OF DISMISSAL
NOTICE IS HEREBY GIVEN that pursuant to Rule 41(a) of the Federal Rules of Civil Procedure, Plaintiff Acclarent, Inc. hereby dismisses with prejudice its complaint against defendant Entellus Medical, Inc., Case Number C-10-003311 EMC.
| Dated: | O’MELVENY & MYERS LLP | |||||
| By: |
| |||||
| Roberta H. Vespremi | ||||||
| 2765 Sand Hill Road | ||||||
| Menlo Park, California 94025 | ||||||
| Telephone: (650) 473-2600 | ||||||
| Facsimile: (650) 473-2601 | ||||||
| E-Mail: rvespremi@omm.com | ||||||
| RICHARD B. GOETZ | ||||||
| O’MELVENY & MYERS LLP | ||||||
| 400 South Hope Street | ||||||
| Los Angeles, California 90071 | ||||||
| Telephone: (213) 430-6000 | ||||||
| Facsimile: (213) 430-6407 | ||||||
| E-Mail: rgoetz@omm.com | ||||||
| Attorneys for Plaintiff | ||||||
| ACCLARENT, INC. | ||||||
| NOTICE OF DISMISSAL | ||||||
| - 2 - | NOTICE OF DISMISSAL |
APPENDIX D
PRESS RELEASE
Entellus Medical Settles Patent Dispute
Maple Grove, MN, (insert date) — Entellus Medical today announced that it has entered into a licensing agreement with Acclarent, Inc. in order to resolve their patent lawsuit. The license agreement is royalty bearing to Acclarent. Additional financial details were not disclosed.
As part of the agreement, the companies will file a joint request for the termination of a patent infringement proceeding brought by Acclarent against Entellus on July 28, 2010 in the U.S. District Court for the Northern District of California.
“We are pleased to have reached a mutually beneficial arrangement,” said Brian Farley, Entellus President and CEO.
About Entellus Medical
Entellus Medical provides minimally invasive therapeutic solutions to healthcare providers and their patients who suffer from sinusitis. Based in Maple Grove, Minn., Entellus Medical manufactures, markets, and distributes its products throughout the United States. For more information about Entellus Medical, FinESS Sinus Treatment and the XprESS Multi-Sinus Dilation Tool, visit www.entellusmedical.com or call 763-463-1595.
- 19 -
Exhibit 1


Entellus Medical Functional INfundibular
Endoscopic Sinus System.
INSTRUCTIONS FOR USE
ALL INSTRUCTIONS, PRECAUTIONS AND WARNINGS SHOULD BE CAREFULLY
READ AND UNDERSTOOD BEFORE USE. FAILURE TO DO SO MAY RESULT IN
COMPLICATIONS.
All packaging and referenced Entellus Medical device components
are LATEX FREE
Caution – Federal (USA) law restricts this device to sale by or on the order of a physician.
System Description
The Entellus Medical, Inc. Functional INfundibular Endoscopic Sinus System (FinESS®) includes the following components:
Micro-Trocar & Access Sheath
The Micro-Trocar provides a small access hole into the Maxillary Sinus through the Canine Fossa. The Micro-Trocar also delivers the Access Sheath, which is intended to maintain consistent access for procedural devices (Cannula / Endoscope & Balloon Catheter).
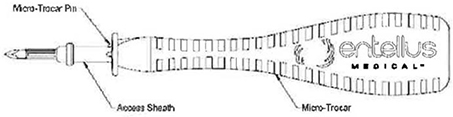
Figure 1 – Sinus Access Tools: Micro-Trocar Inserted Through Access Sheath
Cannula
The Cannula is a dual lumen instrument that allows both delivery of the Balloon Catheter and visualization with an Endoscope. The Cannula is sized to pass through the Access Sheath.

Figure 2 – Sinus Cannula
Balloon Catheter
The Balloon Catheter is designed to dilate the maxillary sinus ostium and the ethmoid infundibulum space. The balloon catheter includes a braided shaft design that allows for rotational positioning to accurately deliver the balloon into the ostium while navigating within the parasinus space.

Figure 3 – Sinus Balloon Dilatation Catheter
| 1108-003 Rev D July 2010 | FinESS® Sinus Treatment | Page 2 of 11 |
Inflation Device
The disposable Entellus Medical, Inc. Inflation Device consists of a syringe barrel, a plunger rod assembly used to generate and control balloon inflation pressures, and a pressure limit mechanism. The pressure limit mechanism limits the amount of positive pressure the Inflation Device can generate to 12 atm +1 atm (176 psi + 14.7 psi).
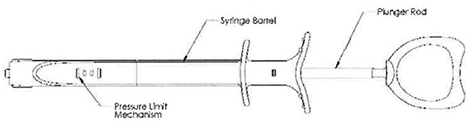
Figure 4 – Inflation Device
All components of the FinESS® Sinus Treatment are provided sterile.
Indication for Use
To access and treat the maxillary sinus ostium and the ethmoid infundibulum in adults with a trans-antral approach. The bony sinus outflow tract is remodeled by balloon displacement of adjacent bone and paranasal sinus structures.
Contraindication
Patients with thickened polypoid mucosa excessive enough to inhibit the visualization of the maxillary ostium should not be considered candidates for the FinESS® Sinus Treatment.
Warnings
| • | Only physicians possessing sufficient skill and expertise in similar technique (accessing maxillary sinus ostium and ethmoid infundibulum through canine fossa) should perform this procedure. |
| • | Do not use the FinESS® Sinus Treatment if CT image indicates challenging anatomy such as a hypoplastic antrum or polypoid mucosa that may limit success of Canine Fossa approach. |
| • | Do not use opened or damaged packages . |
| • | The FinESS® Sinus Treatment is intended for single procedure use only. Do not attempt to reuse or re-sterilize. Device integrity may be compromised. |
| • | Do not apply excessive penetration force when drilling the canine fossa access hole. Patient injury or device damage may occur. |
| • | Do not exceed the maximum recommended balloon inflation pressure (12 atm). Use of the Entellus Medical Inflation Device is required to prevent over-pressurization. |
| • | Do not advance or withdraw the Balloon when inflated. Mucosa damage or device damage may occur. |
| • | As in any upper airway procedure or sinus surgery, do not use CPAP for approximately 7 days post-procedure with FinESS® Sinus Treatment. CPAP usage prior to soft tissue healing may result in facial and/or neck swelling due to subcutaneous emphysema. |
Precautions
| • | FinESS® Sinus Treatment components should be stored in a cool and dry place. Never use a device that is beyond its expiration date. |
| 1108-003 Rev D July 2010 | FinESS® Sinus Treatment | Page 3 of 11 |
| • | FinESS® Sinus Treatment components should be handled with care. Prior to use, and during the procedure, inspect the packaging and components for bends, kinks, or other damage. Discontinue the use of any component that may have been damaged. |
| • | Pay special attention when advancing or withdrawing the Cannula or Balloon Catheter. Never advance, withdraw or torque any component that meets resistance, as this could cause kinking or breaking. If resistance is encountered, use endoscopy to help guide device manipulation. If the cause of resistance cannot be determined, withdraw all components as a system. Do not apply downward force with the Canula during removal, as this may cause damage to the cannula. |
| • | The Balloon Catheter should only be manipulated under endoscopic observation. |
| • | The Balloon Catheter should be positioned with its curved tip in an inferior orientation when tracking through the maxillary sinus ostium and ethmoid infundibulum to avoid tracking into the agger nasi cell. |
| • | Patients should be advised to sneeze with an open mouth and avoid extreme inhalation and blowing through the nose for approximately 7 days post-procedure to reduce the likelihood of inflammation and/or swelling due to subcutaneous emphysema. |
| • | It is important to review the patient’s CT image prior to performing the FinESS® procedure in order to determine the most appropriate access location. |
Adverse Effects
Possible adverse effects include, but are not limited to, the following:
| • | Post-operative facial pain |
| • | Excessive bleeding in the nose and at the canine fossa |
| • | Complication from anesthesia |
| • | Fracture of the anterior wall of the maxillary sinus |
| • | Cerebrospinal fluid leak |
| • | Loss of vision or diplopia (double vision) |
| • | Damage to a tooth root or gingiva |
| • | Damage to nerves potentially causing temporary (and occasionally prolonged) numbness to the cheek, lip, or teeth; mid-facial pain; and tooth pain or hypersensitivity |
| • | Facial bruising and swelling |
| • | Swelling of the nose and cheek |
| • | Fever and infection |
| • | Tissue inflammation |
| • | Continued or worsening sinus symptoms |
Supplies
The following supplies need to be available and prepped prior to use of the FinESS® Sinus Treatment.
Note: These supplies are not provided with the FinESS® Sinus Treatment.
| • | Entellus Flexible Endoscope ES-100 or ES-100a and compatible camera system |
| • | Sterile Saline Solution |
| • | 60 cc Syringe (if irrigation is to be performed) |
| • | Needles and Syringes as required for local anesthesia injections |
| • | Suction system |
| • | #5 and #7 Suction Tips |
| • | Other supplies or medication as per established laboratory protocol |
System Preparation
| 1. | Prepare Imaging Sleeve and Endoscope. |
| 1108-003 Rev D July 2010 | FinESS® Sinus Treatment | Page 4 of 11 |
| a. | Verify endoscope has been disinfected per appropriate instructions. If using Entellus Flexible Endoscope ES-1 00, proceed to step 2. |
| b. | Remove the Imaging Sleeve from its sterile package. |
| c. | While holding the Imaging Sleeve relatively straight, insert the Endoscope into the Male Luer Adapter (see Figure 5) and slide Sleeve over Endoscope. |
Note: The 0.5 mm Endoscope should be handled with care. Avoid stretching or kinking the Endoscope. Device damage may occur.
| 2. | Prepare Cannula. |
| a. | Insert the Endoscope into the Cannula until it is flush with the Cannula tip. |
| b. | Tighten the scope retention valve (see Figure 2) to secure the scope within the Cannula. Verify the Endoscope is flush or just outside (approximately 0.5 mm) of the Cannula. |
| c. | Connect Endoscope to Camera System. |
| d. | While holding the Cannula with the Endoscope Retention Valve positioned down (see Figure 2), rotate the Camera relative to the eyepiece to align the image as desired. |
| 3. | Prepare Micro-Trocar. |
| a. | Remove the Micro-Trocar and Access Sheath from their sterile package. |
| b. | Slide the Access Sheath onto the Micro-Trocar. Rotate Access Sheath on Micro-Trocar until Micro-Trocar Pin engages with Access Sheath allowing Access Sheath to lay flush against the Micro-Trocar (see Figure 1 ). |
| 4a. | Prepare Inflation Device (to prepare the Inflation Device with provided Infusion Line, proceed to step 4b) |
| a. | Remove the Inflation Device from its sterile package. |
| b. | Depress the plunger rod fully into the body of the Inflation Device. |
| c. | Insert the luer end of the Inflation Device into Sterile Saline Solution. Fully retract the plunger rod to the stop position (2nd Detent) as shown in Figure 6. This will fill the barrel with saline solution. |
| d. | While holding the Inflation Device with the luer pointed up, advance the plunger rod into the syringe barrel up to the first detent position (shown in Figure 6) to purge air. The Inflation device is now ready to be connected to the balloon. |
Note: Inspect the syringe barrel to ensure there is minimal air in the system. If excessive air remains in the system, repeat steps b – d.
| 1108-003 Rev D July 2010 | FinESS® Sinus Treatment | Page 5 of 11 |
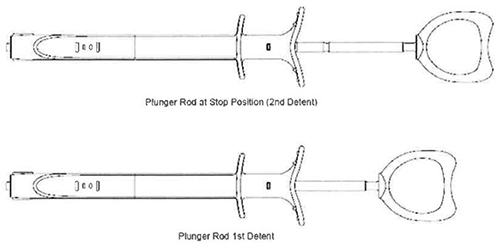
Figure 6
| 4b | Prepare Inflation Device with Infusion Line. |
| a. | Remove the Inflation Device and the Infusion Line from the sterile package. |
| b. | Connect the Infusion Line to the Inflation Device. |
| c. | Insert the luer fitting of the Infusion Line into sterile saline solution. Keep the Inflation Device luer pointed up during the prepping steps to prevent air entrapment. |
| d. | Fully retract the plunger rod to the stop position (2nd Detent) as shown in Figure 6. This will fill the barrel with the saline solution. |
| e. | Advance the plunger rod fully into the syringe barrel to purge air from the system. |
| f. | Repeat steps d and e until no more air is present in the system. |
| g. | With the balloon device full of saline and the plunger fully retracted (to stop position}, advance the plunger to the first detent (Figure 6). The Inflation device is now ready to be connected to the balloon. |
Note: Inspect the syringe barrel to ensure there is minimal air in the system. If excessive air remains in the system, repeat steps c – d.
| 5. | Prepare Balloon Catheter |
| a. | Remove the Balloon Catheter from its sterile package. |
| b. | Connect the Balloon Catheter to the Inflation Device (or Infusion Line, if applicable). |
| c. | While holding the Inflation Device with the Balloon Catheter pointed down, depress the plunger rod with 2 hands, keeping the plunger rod straight, until the distal seal on the orange piston aligns with the distal mark on the inflation device. |
| d. | Pull back on the plunger rod to apply a vacuum to the balloon. Lock the plunger rod in position by pulling it back to the second detent. |
| e. | Remove the Protective Sleeve from the Balloon. Retain the Sleeve for balloon re-wrapping. |
| 1108-003 Rev D July 2010 | FinESS® Sinus Treatment | Page 6 of 11 |
System Operation
| 1. | Patient preparation. |
| a. | Patient preparation should be consistent with standard practice. |
| b. | Anesthesia should be administered appropriately to allow patient tolerance. |
| 2. | Access Maxillary Sinus |
| a. | Firmly lift and retract lip to visualize gingival tissue and feel for canine fossa recess. |
| b. | While retracting lip to minimize gingival tissue thickness, enter tissue with Micro-Trocar. |
| c. | After accessing gingival tissue, position Micro-Trocar tip on bony surface at the intersection location described in Figure 7. |
Note: The target access location is typically on the lateral side of the canine fossa recess.
| Note: | Access location may be confirmed by gently angling the Micro-Trocar to be perpendicular to the facial plane while holding the Micro-Trocar tip on the bone at the target access location. |
| d. | While holding Micro-Trocar at appropriate angle (approximately 45 degrees from the facial plane with the Micro-Trocar tip pointed at the inside corner of the eye}, apply a back-and-forth rotational motion (versus a pushing motion) to gently create an access hole. |
| Note: | Do not apply excessive penetration force when making access hole. |

Figure 7 – Target Access Site Location
| e. | After sinus access is achieved, continue rotating Micro-Trocar with back-and-forth motion while gently angling the Micro-Trocar tip toward the Maxillary Sinus Ostium (corner of the eye). The gentle side-cutting motion provides a range of motion for the Cannula to visualize the Sinus Ostium. |
| Note: | The Micro-Trocar must be rotated with a back-and-forth motion prior to angling the Micro-Trocar. |
| Note: | The Micro-Trocar Pin must be engaged with the Access Sheath to allow side-cutting. If Pin pulls out of Access Sheath, re-insert and continue Micro-Trocar rotations. |
| f. | While holding Access Sheath in access site with one hand, slide the Micro-Trocar out of the Access Sheath with the other hand by using thumb to push the Access Sheath off of the Micro-Trocar. Do not apply downward force with the Micro-Trocar during removal. |
| 1108-003 Rev D July 2010 | FinESS® Sinus Treatment | Page 7 of 11 |
| Note: | If Access Sheath slips out of access site (even if it Is just removed from the hole in the bone) at any time, re-load Access Sheath onto Micro-Trocar and use Micro-Trocar to locate original hole, or to re-access in a secondary location. Do not attempt to re-access the hole with the Access Sheath only. Access Sheath damage may occur. |
| g. | Use a standard #5 suction tip to aspirate fluid from the access sheath as required. |
| 3. | Insert Cannula into Access Sheath under endoscopic visualization. |
| Note: | The Cannula should be inserted up to the Cannula Shaft Mark (see Figure 2) to ensure the Cannula passes completely through the Access Sheath. Failure to accurately position the Cannula Shaft Mark may result In balloon damage. |
| Note | At any time during the procedure, the Cannula may be removed from the Access Sheath to clean the Endoscope by gently pulling the Cannula tip I Endoscope tip across a surgical wipe soaked in an appropriate cleaning medium. Do not apply downward force with the Cannula during removal. |
| 4. | Visualize presence of air / fluid level within sinus. |
| a. | If fluid level impedes endoscopic visualization, aspiration and/or irrigation may be required. |
| b. | Remove Cannula from Access Sheath to complete aspiration and/or irrigation. |
| c. | Insert Cannula into Access Sheath. Verify acceptable fluid level. Excess residual saline in the sinus should be gently aspirated through a standard #5 suction device. |
| 5. | Visualize the maxillary sinus ostium. |
| a. | While holding the Access Sheath in the access site, gently manipulate the Cannula to visualize the maxillary sinus ostium. |
| b. | While visualizing the ostium, topical anesthetic may be sprayed through the Cannula for additional topical anesthesia as required. |
| Note: | Use suction to remove residual anesthetic from Cannula using a standard #5 tip as required. |
| 6. | Introduce the Balloon Catheter through the Cannula. |
| Note: | The Balloon Catheter should be tracked through the Cannula while under vacuum from the Inflation Device. |
| 7. | Advance the Balloon across the ostium under endoscopic visualization. |
| a. | When the Balloon Catheter tip is positioned just outside of the ostium, advance the balloon into the sinus ostium with the curved catheter tip pointed posterior / inferior. |
Note: The arrow on the Balloon Catheter hub indicates the direction of the tip curve.
| b. | Using the Shaft Marker (see Figure 3) as a visual reference for the proximal balloon end, position the Balloon within the ostium / infundibulum. |
| Note: | The Balloon Catheter may be rotationally steered to allow full insertion of the balloon into the ostium and infundibulum. |
| 8 | Inflate Balloon. |
| a. | Slowly depress the plunger rod with 2 hands, keeping the plunger rod straight, to inflate the balloon. The pressure should be increased slowly (5-7 seconds) until the distal seal on the orange piston reaches the distal mark on the inflation device. |
| Note: | Do not use air or any gaseous medium to inflate the balloon. |
| b. | Inflate sinus balloon until desired result is achieved. Endoscopically observe balloon dilation. |
| Note: | Do not exceed the maximum pressure of 12 atm. |
| 1108-003 Rev D July 2010 | FinESS® Sinus Treatment | Page 8 of 11 |
| c. | After balloon dilation is complete, deflate the sinus balloon by gently pulling back on the plunger rod. Confirm the balloon deflation endoscopically. |
| d. | Lock the plunger rod in place by pulling it back to the second detent position. A stop will prevent the plunger rod form being removed from the inflation device. |
| e. | Verify the Cannula is inserted into the Access Sheath up to the Shaft Mark to ensure the Cannula tip is inserted beyond the Access Sheath. |
| f. | Withdraw balloon from Cannula under endoscopic visualization. |
| Note: | Rotating the Catheter as the Balloon begins to engage the Cannula will assist in balloon withdrawal. |
| 9. | Endoscopically observe balloon dilation result. |
| a. | If the maxillary sinus ostium has been adequately dilated, remove Cannula and Access Sheath from access site. Do not apply downward force with the Cannula during removal, as this may cause damage to the cannula. |
| Note: | Adequate dilation can be visually confirmed by observing the balloon during inflation, visually verifying balloon positioning during Inflation, and ensuring that the recommended inflation pressure Is achieved. |
| b. | If additional balloon dilation is required, prepare Balloon Catheter per step 10 and repeat steps for Balloon inflation. |
| 10. | Prepare Balloon Catheter for additional dilations (if required). |
| a. | Gently advance the plunger rod into the syringe barrel to expand the balloon using minimal pressure. |
| b. | Rinse balloon with sterile saline or water. |
| c. | Wipe balloon dry using gauze pad. |
| d. | Point the distal tip of the balloon catheter down. Gently pull back on the plunger rod to apply vacuum to the balloon. Lock the plunger rod by pulling it back to the second detent position. |
| e. | Re-wrap the tri-folded balloon by gently folding the wings around the catheter shaft in a clockwise direction. |
| f. | Slide the Protective Sleeve on the re-wrapped balloon to restore original balloon profile. |
| g. | Before additional balloon dilatation, remove the Protective Sleeve from the Balloon. Retain the Sleeve for Balloon re-wrapping. |
| 11. | Repeat procedure for contralateral maxillary sinus if needed. |
| Note: | The scope image may need to be re-aligned prior to viewing second side. While holding the Cannula with the Endoscope Retention Valve positioned down (see Figure 2), rotate the Camera relative to the eye piece to align the image as desired. |
| 12. | After completing the entire procedure, withdraw all system components and discard. |
| 1108-003 Rev D July 2010 | FinESS® Sinus Treatment | Page 9 of 11 |
Limited Warranty
Entellus Medical, Inc. warrants that reasonable care has been used in the design and manufacture of the FinESS® Sinus Treatment system. This limited warranty is in lieu of and excludes all other warranties not expressly set forth herein, whether expressed or implied, written or oral, by operation of law or otherwise including, but not limited to, any implied warranties of merchantability or fitness for a particular purpose, or warranties arising from a course of dealing or usage or trade. Handling, storage, cleaning and sterilization of the FinESS® Sinus Treatment system, as well as other factors relating to the patient, diagnosis, treatment, medical procedures, and other matters beyond Entellus Medical, Inc.’s control, directly affect the FinESS® Sinus Treatment system and the results obtained from its use. This limited warranty does not extend to any abuse or misuse of the FinESS® Sinus Treatment system (including, without limitation, off-label use), accident to or neglect of the FinESS® Sinus Treatment system, failure to follow any instructions or specifications provided with the FinESS® Sinus Treatment system (including, without limitation, any re-use, re-processing or re-sterilization of the FinESS® Sinus Treatment system not in accordance with such instructions or specifications), in each case whether caused or carried out by Customer or by any third party.
Entellus Medical’s obligation under this limited warranty is limited, at Entellus Medical, Inc.’s option, to the repair or replacement of the FinESS® Sinus Treatment system for a period of twelve (12) months from the date of purchase (the “Warranty Period”) using commercially reasonable efforts within a reasonable period of time. Entellus Medical, Inc. shall not be liable for any incidental or consequential loss, damage or expense directly or indirectly arising from use of the FinESS® Sinus Treatment system. Repair or replacement of the FinESS® Sinus Treatment system shall not extend the term of any applicable warranty and the original term of such warranty shall remain in effect. Repairs, modifications or alterations of the FinESS® Sinus Treatment system performed by any person or entity other than Entellus Medical, Inc. or approved by Entellus Medical, Inc. in writing shall nullify and otherwise void all applicable warranties hereunder.
Entellus Medical, Inc. shall be obligated to honor the express limited warranties contained herein only upon receipt of full payment for the FinESS® Sinus Treatment system or otherwise in accordance with the payment terms agreed to by Entellus Medical, Inc. and Customer.
Entellus Medical, Inc. neither assumes, nor authorizes any other person to assume for it, any other or additional liability or responsibility in connection with the FinESS® Sinus Treatment system.
Limitation of Liability
In no event will either Entellus Medical, Inc. or Customer be liable to the other or to any third party for loss of profit, goodwill or other indirect, incidental, special or consequential or other similar damages arising out of these Terms and Conditions or any Related Purchase Document. The limitation of liability described in this section is in addition to any limitation provided for by the Limited Warranty provisions.
| 1108-003 Rev D July 2010 | FinESS® Sinus Treatment | Page 10 of 11 |
Symbols

This product is protected by US Patent No. 7,520,876. Other US Patents Pending.
©2009 Entellus Medical. All rights reserved. FinESS® is a registered trademark of Entellus Medical.

| 1108-003 Rev D July 2010 | FinESS® Sinus Treatment | Page 11 of 11 |
Exhibit 2

Entellus Medical
Flexible Endoscope with Fixed Eye Piece
INSTRUCTIONS FOR USE
ALL INSTRUCTIONS, PRECAUTIONS AND WARNINGS SHOULD BE CAREFULLY READ AND UNDERSTOOD BEFORE USE. FAILURE TO DO SO MAY RESULT IN COMPLICATIONS AND WILL VOID ANY EFFECTIVE
WARRANTY.
Caution – Federal (USA) law restricts this device to sale by or on the order of a physician.
| 1545-001rC January 2011 | Flexible Endoscope with Fixed Eye Piece | Page 1 of 8 |
SYSTEM DESCRIPTION
The Entellus Medical Flexible Endoscope with Fixed Eye Piece System Includes the following components:
| • | Flexible Endoscope |
| • | The Flexible Endoscope has 0º direction of view and greater than a 55º field of view. The optimum working distance of the endoscope is between 0 – 20mm and has a working diameter of 0.5mm. |
| • | The eye cup of the endoscope is compatible with “B” mount camera couplers. |
INDICATION FOR USE
The Entellus Flexible Endoscope & Eye Piece is Intended to visualize the Internal cavities of the ear, airways, nose, and sinus cavities during diagnostic and therapeutic endoscope procedures. The device can be used with compatible video systems.
CONTRAINDICATIONS
The use of endoscopes are not permissible in situations where endoscopic procedures are contraindicated for medical reasons.
| 1545-001rC January 2011 | Flexible Endoscope with Fixed Eye Piece | Page 2 of 8 |
WARNINGS
| • | The Flexible Endoscope with Fixed Eye Piece are provided NON-STERILE and must be either disinfected or sterilized prior to each and every use (see Care & Handling, Cleaning, High-Level-Disinfection, Sterilization sections included within this document). Cleaning, disinfection and/or sterilization of this product must be performed by staff that are skilled in the reprocessing of medical devices following the directions and guidelines provided In this manual. |
| • | Do not sterilize the Flexible Endoscope with Fixed Eye Piece in an autoclave or other types of steam sterilization. Exposure to temperatures greater than 65ºC (150ºF) may damage the devices. |
| • | Do not clean the Flexible Endoscope with Fixed Eye Piece with ultrasonic cleaning or automated washing systems. Automated washing or ultrasonic cleaning can permanently damage the endoscope lens and fiber optic components. |
| • | Do not use an endoscope that has been damaged. Use of equipment that is not in sound working condition could compromise patient safety. |
| • | Do not subject the exposed portion of the endoscope to a radius of curvature less than 15mm. Do not subject the remaining portion of the endoscope to a radius of curvature less than 8cm, damage to the endoscope can occur. |
| • | High energy light radiated through endoscopes can result In high temperatures in front of the light outlet, at the end faces of the light guide of the endoscope. |
PRECAUTIONS
| • | Check the Flexible Endoscope with Fixed Eye Piece prior to each use to ensure that it has been property cleaned, disinfected and/or sterilized. |
| • | Prior to use, the Flexible Endoscope with Fixed Eye Piece should be inspected for bends, kinks, or other damage. Verify that an image is being projected through the device by looking through the Eye Piece and pointing the distal segment of the flexible endoscope towards a bright object. Discontinue the use of the flexible endoscope that may have been damaged or does not project an image. |
| • | If a malfunction should occur during procedural use the flexible endoscope should be carefully removed from the patient. Consult the Return for Service section of this document for customer service contact Information. |
Care & Handling
The Flexible Endoscope with Fixed Eye Piece are constructed with glass fiberoptic and lens components. Special care must be taken In order to prevent damage to the optics and to maintain optimal functionality and longevity of the endoscope.
| • | Handle the endoscope system first by the scope body and second midway through the flexible segment of the endoscope keeping close observation of the distal end to avoid damage. |
| • | Protect the endoscope system during procedural use and transportation between the procedural room and reprocessing location. Avoid harmful interaction with other surgical instruments or tools. The endoscope has an exposed distal segment that is subject to damage if misused. |
| 1545-001rC January 2011 | Flexible Endoscope with Fixed Eye Piece | Page 3 of 8 |
CLEANING (PRIOR TO DISINFECTION OR STERILIZATION)
Prior to initial use and after every use the endoscope must be cleaned of all tissue, materials and debris with an enzymatlc cleaner / detergent. The Flexible Endoscope with Eye Piece have been validated through 25 cleaning cycles (ENZOL® Enzymatic Detergent is recommended). This cleaning must be performed prior to disinfection or sterilization. All instructions provided by the enzymatic detergent manufacturer must be followed when performing the cleaning process.
| • | Wear all manufacturer recommended personal protective clothing I equipment prior to performing any cleaning procedure. |
| • | Prepare the enzymatic cleaner / detergent per the manufacturer’s instructions. |
| • | Perform the cleaning process paying close attention to the exposed distal segment of the endoscope. This area should be gently but thoroughly wiped to remove any contaminants remaining on the endoscope. If coiling of the scope occurs during cleaning adhere to the recommendations regarding the minimum bend radius specified In the Warnings section of this document. |
| • | After completing the cleaning cycle rinse the device per the cleaning agent instructions. |
| • | A wipe containing IPA may be used on the lenses of the Flexible Endoscope with Fixed Eye Piece to help remove residual fluid from these surfaces. For best results, wipe across the face of the distal lens. |
HIGH LEVEL DISINFECTION
The Flexible Endoscope with Fixed Eye Piece can be disinfected with CIDEX® OPA High Level Disinfecting Solution. The Flexible Endoscope with Fixed Eye Piece have been validated through 25 high level disinfection cycles. All instructions provided by the manufacturer of CIDEX® OPA should be followed when performing the disinfection process.
| • | Don personal protective equipment per the CIDEX® OPA recommended instructions. |
| • | Assure that the endoscope has undergone a cleaning process with an enzymatic detergent. |
| • | When placing the endoscope into the reprocessing container adhere to the recommendations regarding the minimum bend radius specified in the Warnings section. |
| • | Perform the CIDEX OPA disinfection process per the manufacturer’s instructions for use. |
| • | Use standard clean techniques to dry the endoscope and pass Into the clean field for procedural use. |
| • | A sterile alcohol wipe may be used on the lenses of the Flexible Endoscope with Fixed Eye Piece to help remove residual fluid from these surfaces. For best results, wipe across the face of the distal lens. |
| 1545-001rC January 2011 | Flexible Endoscope with Fixed Eye Piece | Page 4 of 8 |
STERILIZATION
The Flexible Endoscope with Fixed Eye Piece is compatible with STERIS SYSTEM 1E®, STERRAD® 100S, and STERRAD® NX™ sterilization methods. The Flexible Endoscope with Fixed Eye Piece has been validated through 25 reprocessing cycles.
STERIS SYSTEM 1E®—All instructions provided by STERIS Corporation should be followed when performing the sterilization process.
| • | The sterilization process should be started within 30 minutes of the cleaning procedure. |
| • | Don personal protective equipment per the STERIS SYSTEM 1E® recommended instructions |
| • | Obtain a compatible reprocessing tray for the Flexible Endoscope with Fixed Eye Piece. STERIS catalog No’s C1200 General Processing Tray, C1220 Directed Flow Processing Tray and Container, and C1140 Flexible Endoscope Processing Tray and Container are all acceptable for use. |
| • | Place the device into the processing tray in a large radius and adhere to the recommendations regarding the minimum bend radius of the Flexible Endoscope with Fixed Eye Piece specified In the Warnings section. Up to 3 endoscope may be processed per cycle. |
| • | Avoid placing the distal segment of the endoscope in a position that may cause it to be crushed during processing. |
| • | Perform the sterilization process per the STERIS SYSTEM 1E® instructions for use. |
| • | Using standard sterile techniques dry the endoscope and pass into the sterile field for procedural use. |
| • | A sterile alcohol wipe may be used on the lenses of the Flexible Endoscope with Fixed Eye Piece to help remove residual fluid from these surfaces. For best results, wipe across the face of the distal lens. |
STERRAD® 100S & NX™ – All instructions provided by Advanced Sterilization Products (ASP) should be followed when performing STERRAD sterilization processes. STERRAD sterilization methods use a plasma that is known to cause discoloration to aluminum alloys Discoloration to the Flexible Endoscope with Fixed Eye Piece may occur after repeated processing but will not affect the system from being sterilized or alter the performance of the device.
| • | The sterilization process should be started within 30 minutes of the cleaning procedure. |
| • | Don personal protective equipment per the STERRAD recommended instructions |
| • | Obtain a compatible reprocessing tray for the Flexible Endoscope with Fixed Eye Piece. Refer to the Storage & Tray Loading section of this document for recommendations. |
| • | Place the device into the processing tray in a large radius and adhere to the recommendations regarding the minimum bend radius of the Flexible Endoscope with Fixed Eye Piece specified In the Warnings section. |
| • | Avoid placing the distal segment of the endoscope In a position that may cause it to be crushed during processing. |
| • | Perform the sterilization process per the STERRAD® instructions for use. |
| • | Using standard sterile techniques pass the endoscope into the sterile field for procedural use. |
| • | A sterile alcohol wipe may be used on the lenses of the Flexible Endoscope with Fixed Eye Piece to help remove residual fluid from these surfaces. For best results, wipe across the face of the distal lens. |
| 1545-001rC January 2011 | Flexible Endoscope with Fixed Eye Piece | Page 5 of 8 |
STORAGE & TRAY LOADING
Storage of the Flexible Endoscope with Fixed Eye Piece can be conducted In several ways. First, adherence to all standard operating procedures and guidelines of the clinical site must be followed. The following recommendations may be followed for storage of the Flexible Endoscope with Fixed Eye Piece if it does not conflict with internal procedural site standards.
| • | It is recommended that the endoscope be stored in its own separate container. Interaction with other Instruments may cause damage to the endoscope and reduce the useful lifespan. |
| • | Obtain a container capable of storing the scope in a configuration that does not exceed the minimum bending radius specified In the Warnings section. It is recommended to use a storage container approved by Entellus Medical Inc. |
| • | Lay the endoscope Into the container first by the endoscope body and then by the flexible segment. The endoscope body should be secured within the tray either by tying it to the tray or using securing inserts that are compatible with the endoscope. |
ACCESSORIES
The Flexible Endoscope with Fixed Eye Piece is packaged with 2 light post adapters. Retain the light post adapters with the endoscope for use with various configuration light cables (i.e. ACMI, Wolf, Storz, Olympus).
IMAGING ENHANCEMENT
Equipment Recommendations
For optimum visual performance, use the endoscope with a xenon light source greater than 150W, a light cable with an illumination fiber bundle less than 5mm in diameter, a high definition camera system, and a ³19” display. High definition camera systems with image enhancement options (i.e. – gain, zoom adjustment) are preferred for optimum viewing and can potentially compensate for lower quality Imaging. For options on enhancing the projected Image refer to the IFU’s supplied with camera, light source and display.
WARRANTY ASSESSMENT / RETURN FOR SERVICE
If an endoscope becomes damaged or falls to project an image take the following actions to have the scope assessed for warranty coverage or replacement.
Contact Customer Service. Describe malfunction.
Phone: (866) 620-7615
Fax: (866) 620-7616
If returning devices for assessment all products must be disinfected or sterilized prior to shipping per one of the approved methods described within this document. Documentation must be provided stating the devices have been reprocessed prior to shipping.
| 1545-001rC January 2011 | Flexible Endoscope with Fixed Eye Piece | Page 6 of 8 |
Limited Warranty
Entellus Medical, Inc. warrants that reasonable care has been used in the design and manufacture of the Entellus Medical Flexible Endoscope with Fixed Eye Piece. This limited warranty is in lieu of and excludes all other warranties not expressly set forth herein, whether expressed or implied, written or oral, by operation of law or otherwise Including, but not limited to, any Implied warranties of merchantability or fitness for a particular purpose, or warranties arising from a course of dealing or usage or trade. Handling, storage, cleaning and sterilization of the Entellus Medical Flexible Endoscope with Fixed Eye Piece, as well as other factors relating to the patient, diagnosis, treatment, medical procedures, and other matters beyond Entellus Medical, Inc.’s control, directly affect the Entellus Medical Flexible Endoscope with Fixed Eye Piece and the results obtained from its use. This limited warranty does not extend to any abuse or misuse of the Entellus Medical Flexible Endoscope with Fixed Eye Piece (including, without limitation, off-label use), accident to or neglect of the Entellus Medical Flexible Endoscope with Fixed Eye Piece, failure to follow any Instructions or specifications provided with the Entellus Medical Flexible Endoscope with Fixed Eye Piece (including, without limitation, any re-use, re-processing or re-sterilization of the Entellus Medical Flexible Endoscope with Fixed Eye Piece not in accordance with such Instructions or specifications), in each case whether caused or carried out by Customer or by any third party.
Entellus Medical’s obligation under this limited warranty is limited, at Entellus Medical Inc.’s option, to the repair or replacement of the Entellus Medical Flexible Endoscope with Fixed Eye Piece for a period of twelve (12) months from the date of purchase (the “Warranty Period”) using commercially reasonable efforts within a reasonable period of time. Entellus Medical, Inc. shall not be liable for any incidental or consequential loss, damage or expense directly or Indirectly arising from use of the Entellus Medical Flexible Endoscope with Fixed Eye Piece. Repair or replacement of the Entellus Medical Flexible Endoscope with Fixed Eye Piece shall not extend the term of any applicable warranty and the original term of such warranty shall remain in effect. Repairs, modifications or alterations of the Entellus Medical Flexible Endoscope with Fixed Eye Piece performed by any person or entity other than Entellus Medical, Inc. or approved by Entellus Medical Inc. in writing shall nullify and otherwise void all applicable warranties hereunder.
Entellus Medical, Inc. shall be obligated to honor the express limited warranties contained herein only upon receipt of full payment for the Entellus Medical Flexible Endoscope with Fixed Eye Piece or otherwise in accordance with the payment terms agreed to by Entellus Medical, Inc. and Customer.
Entellus Medical Inc. neither assumes, nor authorizes any other person to assume for It, any other or additional liability or responsibility in connection with the Entellus Medical Flexible Endoscope with Fixed Eye Piece.
Limitation of Liability
In no event will either Entellus Medical Inc. or Customer be liable to the other or to any third party for loss of profit, goodwill or other indirect, incidental, special or consequential or other similar damages arising out of these Terms and Conditions or any Related Purchase Document. The limitation of liability described in this section is in addition to any limitation provided for by the Limited Warranty provisions.
| 1545-001rC January 2011 | Flexible Endoscope with Fixed Eye Piece | Page 7 of 8 |
Symbols
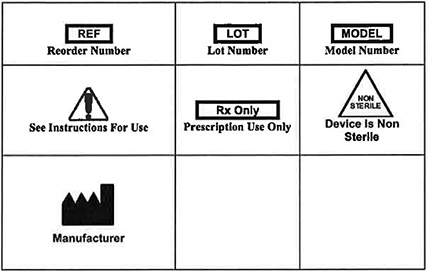
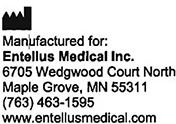
U.S. and Foreign patents pending.
| 1545-001rC January 2011 | Flexible Endoscope with Fixed Eye Piece | Page 8 of 8 |
Exhibit 3
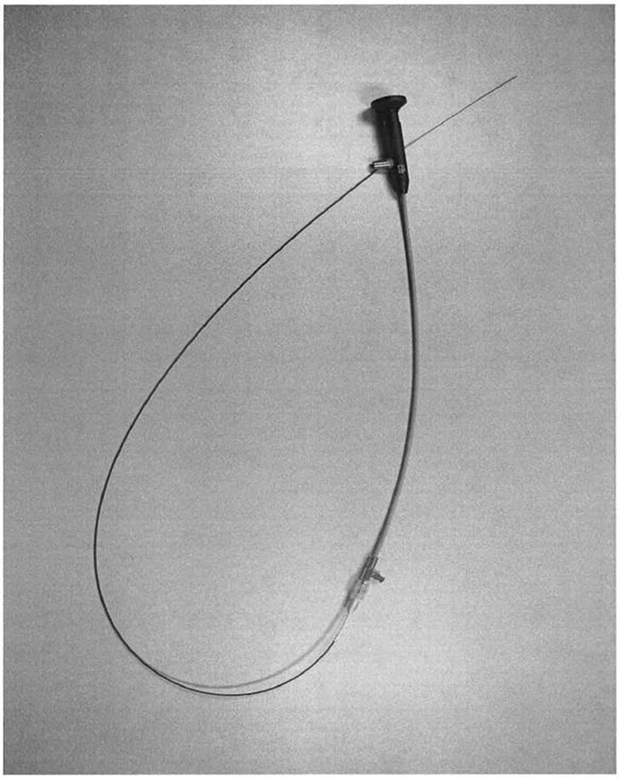
Exhibit 4
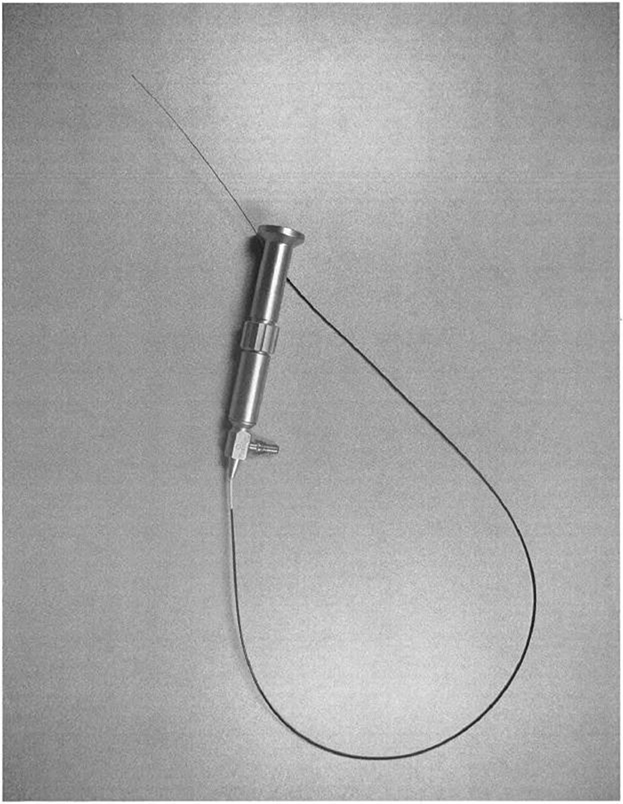
Exhibit 5

Entellus Medical Functional INfundibular Endoscopic Sinus System.
INSTRUCTIONS FOR USE
ALL INSTRUCTIONS, PRECAUTIONS AND WARNINGS SHOULD BE CAREFULLY
READ AND UNDERSTOOD BEFORE USE. FAILURE TO DO SO MAY RESULT IN
COMPLICATIONS.
All packaging and referenced Entellus Medical device components
are LATEX FREE
Caution – Federal (USA) law restricts this device to sale by or on the order of a physician.
System Description
The Entellus Medical, Inc. Functional INfundibular Endoscopic Sinus System (FinESS®) includes the following components:
Micro-Trocar, Access Sheath & Access Sheath Spacer
The Micro-Trocar provides a small access hole into the Maxillary Sinus through the Canine Fossa. The Micro-Trocar also delivers the Access Sheath, which is intended to maintain consistent access for procedural devices (FinESS® Endoscope & Balloon Catheter) and to position the FinESS® Endoscope. The Access Sheath Spacer can be removed from the Access Sheath to allow the FinESS® Endoscope to be re-positioned.

Figure 1 – Sinus Access Tools: Micro-Trocar Inserted Through Access Sheath and Access Sheath Spacer
Baloon Catheter
The Balloon Catheter is designed to dilate the maxillary sinus ostium and the ethmoid infundibulum space. The balloon catheter includes a braided shaft design that allows for rotational positioning to accurately deliver the balloon into the ostium while navigating within the parasinus space.

Figure 2 – Sinus Balloon Dilatation Catheter
Inflation Device
The disposable Entellus Medical, Inc. Inflation Device consists of a syringe barrel, a plunger rod assembly used to generate and control balloon inflation pressures, and a pressure limit mechanism. The pressure limit mechanism limits the amount of positive pressure the Inflation Device can generate to 12 atm +1 atm (176 psi + 14.7 psi).
Figure 3 – Inflation Device
| 1108-004 Rev C May 2010 | FinESS® Sinus Treatment | Page 2 of 11 |
Extension Line
The Extension Line may be connected to the Inflation Device to provide extra length to maneuver the balloon if necessary.

Figure 4 – Infusion Line
All components of the FinESS® Sinus Treatment are provided sterile.
Indication for Use
To access and treat the maxillary sinus ostium and the ethmoid infundibulum in adults with a trans-antral approach. The bony sinus outflow tract is remodeled by balloon displacement of adjacent bone and paranasal sinus structures.
Contraindications
Patients with thickened polypoid mucosa excessive enough to inhibit the visualization of the maxillary ostium should not be considered candidates for the FinESS® Sinus Treatment.
Warnings
| • | Only physicians possessing sufficient skill and expertise in similar technique (accessing maxillary sinus ostium and ethmoid infundibulum through canine fossa) should perform this procedure. |
| • | Do not use the FinESS® Sinus Treatment if CT image indicates challenging anatomy such as a hypoplastic antrum or polypoid mucosa that may limit success of Canine Fossa approach. |
| • | Do not use opened or damaged packages . |
| • | The FinESS® Sinus Treatment is intended for single procedure use only. Do not attempt to reuse or re-sterilize. Device integrity may be compromised. |
| • | Do not apply excessive penetration force when drilling the canine fossa access hole. Patient injury or device damage may occur. |
| 1108-004 Rev C May 2010 | FinESS® Sinus Treatment | Page 3 of 11 |
| • | Do not exceed the maximum recommended balloon inflation pressure (12 atm). Use of the Entellus Medical Inflation Device is required to prevent over-pressurization. |
| • | Do not advance or withdraw the Balloon when inflated. Mucosa damage or device damage may occur. |
| • | As in any upper airway procedure or sinus surgery, do not use CPAP until the physician has confirmed that the tissue is adequately healed. CPAP usage prior to soft tissue healing may result in facial and/or neck swelling due to subcutaneous emphysema. |
Precautions
| • | FinESS® Sinus Treatment components should be stored in a cool and dry place. Never use a device that is beyond its expiration date. |
| • | FinESS® Sinus Treatment components should be handled with care. Prior to use, and during the procedure, inspect the packaging and components for bends, kinks, or other damage. Discontinue the use of any component that may have been damaged. |
| • | Pay special attention when advancing or withdrawing the Endoscope or Balloon Catheter. Never advance, withdraw or torque any component that meets resistance, as this could cause kinking or breaking. If resistance is encountered, use endoscopy to help guide device manipulation. If the cause of resistance cannot be determined, withdraw all components as a system. |
| • | The Balloon Catheter should only be manipulated under endoscopic observation. |
| • | Patients should be advised to sneeze with an open mouth and avoid extreme inhalation and blowing through the nose for approximately 7 days post-procedure to reduce the likelihood of inflammation and/or swelling due to subcutaneous emphysema. |
| • | It is important to review the patient’s CT image prior to performing the FinESS® procedure in order to determine the most appropriate access location and to appreciate unique anatomical characteristics, eg. agger nasi cell, that may impact placement of the balloon into the desired treatment location. |
Adverse Effects
Possible adverse effects include, but are not limited to, the following:
| • | Post-operative facial pain |
| • | Excessive bleeding in the nose and at the canine fossa |
| • | Complication from anesthesia |
| • | Fracture of the anterior wall of the maxillary sinus |
| • | Cerebrospinal fluid leak |
| • | Loss of vision or diplopia (double vision) |
| • | Damage to a tooth root or gingiva |
| • | Damage to nerves potentially causing temporary (and occasionally prolonged) numbness to the cheek, lip, or teeth; mid-facial pain; and tooth pain or hypersensitivity |
| • | Facial bruising and swelling |
| • | Swelling of the nose and cheek |
| • | Fever and infection |
| • | Tissue inflammation |
| • | Continued or worsening sinus symptoms |
Supplies
The following supplies need to be available and prepped prior to use of the FinESS® Sinus Treatment.
Note: These supplies are not provided with the FinESS® Sinus Treatment.
| • | FinESS® Endoscope and compatible camera system |
| • | Sterile Saline Solution |
| 1108-004 Rev C May 2010 | FinESS® Sinus Treatment | Page 4 of 11 |
| • | 60 cc Syringe (if irrigation is to be performed) |
| • | Needles and Syringes as required for local anesthesia injections |
| • | Suction system |
| • | #5 and #7 Suction Tips |
| • | Other supplies or medication as per established laboratory protocol |
System Preparation
| 1. | Prepare the FinESS® Endoscope. |
| a. | Verify endoscope has been disinfected per appropriate instructions. |
| b. | Connect the FinESS® Endoscope to an appropriate light source and cameras specified in the FinESS® Endoscope instructions for use. |
| c. | While holding the FinESS® Endoscope, rotate the Camera relative to the eyepiece to align the image as desired. |
| 2. | Prepare Micro-Trocar. |
| a. | Remove the Micro-Trocar and Access Sheath from their sterile package. |
| 3a. | Prepare Inflation Device (to prepare the Inflation Device with provided Infusion Line, proceed to step 3b) |
| a. | Remove the Inflation Device from its sterile package. |
| b. | Depress the plunger rod fully into the body of the Inflation Device. |
| c. | Insert the luer end of the Inflation Device into Sterile Saline Solution. Fully retract the plunger rod to the stop position (2nd Detent) as shown in Figure 6. This will fill the barrel with saline solution. |
| d. | While holding the Inflation Device with the luer pointed up, advance the plunger rod into the syringe barrel one click to the position shown in Figure 6 to purge air. The Inflation Device is now ready to be connected to the balloon. |
Note: Inspect the syringe barrel to ensure there is minimal air in the system. If excessive air remains in the system, repeat steps b – d.
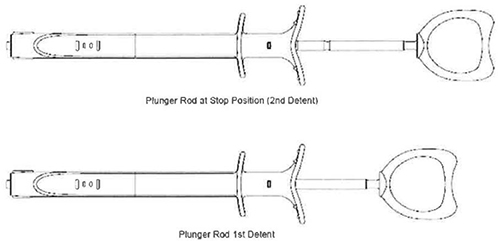
Figure 6
| 3b. | Prepare Inflation Device with Infusion Line. |
| a. | Remove the Inflation Device and the Infusion Line from the sterile package. |
| 1108-004 Rev C May 2010 | FinESS® Sinus Treatment | Page 5 of 11 |
| b. | Connect the Infusion Line to the Inflation Device. |
| c. | Insert the luer fitting of the Infusion Line into sterile saline solution. Keep the Inflation Device luer pointed up during the prepping steps to prevent air entrapment. |
| d. | Fully retract the plunger rod to the stop position (2nd Detent) as shown in Figure 6. This will fill the barrel with the saline solution. |
| e. | Advance the plunger rod fully into the syringe barrel to purge air from the system. |
| f. | Repeat steps d and e until no more air is present in the system. |
| g. | With the balloon device full of saline and the plunger fully retracted (to stop position}, advance the plunger to the first detent (Figure 6). The Inflation device is now ready to be connected to the balloon. |
Note: Inspect the syringe barrel to ensure there is minimal air in the system. If excessive air remains in the system, repeat steps d – e.
| 4. | Prepare Balloon Catheter |
| a. | Remove the Balloon Catheter from its sterile package. |
| b. | Connect the Balloon Catheter to the Inflation Device (or Infusion Line, if applicable). |
| c. | While holding the Inflation Device with the Balloon Catheter pointed down, depress the plunger rod with 2 hands, keeping the plunger rod straight, until the distal seal on the orange piston aligns with the distal mark on the inflation device. |
| d. | Pull back on the plunger rod to the stop (2nd detent) position to apply a vacuum to the balloon. |
| e. | Remove the balloon protector from the Balloon. Retain the balloon protector for balloon re-wrapping. |
System Operation
| 1. | Patient preparation. |
| a. | Patient preparation should be consistent with standard practice. |
| b. | Anesthesia should be administered appropriately to allow patient tolerance. |
| 2. | Access Maxillary Sinus |
| a. | Firmly lift and retract lip to visualize gingival tissue and feel for canine fossa recess. |
| b. | While retracting lip to minimize gingival tissue thickness, enter tissue with Micro-Trocar. |
| c. | After accessing gingival tissue, position Micro-Trocar tip on bony surface at the intersection location described in Figure 7. |
| Note: | The target access location is typically on the lateral side of the canine fossa recess. |
| Note: | Access location may be confirmed by gently angling the Micro-Trocar to be perpendicular to the facial plane while holding the Micro-Trocar tip on the bone at the target access location. |
| d. | While holding Micro-Trocar at appropriate angle (approximately 45 degrees from the facial plane with the Micro-Trocar tip pointed at the inside corner of the eye}, apply a back-and-forth rotational motion (versus a pushing motion) to gently create an access hole. |
| Note: | Do not apply excessive penetration force when making access hole. |
| 1108-004 Rev C May 2010 | FinESS® Sinus Treatment | Page 6 of 11 |
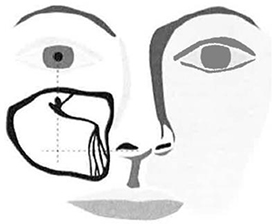
Figure 7 – Target Access Site Location
| e. | After sinus access is achieved, continue rotating Micro-Trocar with back-and-forth motion while gently angling the Micro-Trocar tip toward the Maxillary Sinus Ostium (corner of the eye). The gentle side-cutting motion provides a range of motion for the FinESS® Endoscope to visualize the Sinus Ostium. |
| Note: | The Micro-Trocar must be rotated with a back-and-forth motion prior to angling the Micro-Trocar. |
| Note: | The Micro-Trocar Pin must be engaged with the Access Sheath to allow side-cutting. If Micro-Trocar pulls out of Access Sheath, re-insert and continue Micro-Trocar rotations. |
| f. | While holding Access Sheath in access site with one hand, slide the Micro-Trocar out of the Access Sheath with the other hand by using thumb to push the Access Sheath off of the Micro-Trocar. Do not apply downward force with the Micro-Trocar during removal. |
| Note: | If Access Sheath slips out of access site (even if it Is just removed from the hole in the bone) at any time, re-load Access Sheath onto Micro-Trocar and use Micro-Trocar to locate original hole, or to re-access in a secondary location. Do not attempt to re-access the hole with the Access Sheath only. Access Sheath damage may occur. |
| g. | Use a standard #5 suction tip to aspirate fluid from the access sheath as required. |
| 3. | While holding the FinESS® Endoscope in an upright position insert the FinESS® Endoscope into Access Sheath under endoscopic visualization. |
| Note: | The FinESS® Endoscope should be inserted the Access Sheath until the Endoscope is seated against the Access Sheath Spacer (see Figure 1). Failure to accurately position the Endoscope may result In balloon damage. |
| Note: | The Access Sheath Spacer may be removed from the Access Sheath to allow additional Endoscope insertion depth if necessary. The FinESS® Endoscope should be inserted until the Endoscope is seated against the Access Sheath (see Figure 1). Failure to accurately position the Endoscope may result in balloon damage. |
| Note: | At any time during the procedure, the Endoscope may be removed from the Access Sheath to clean the Endoscope by gently wiping the Endoscope tip across an alcohol prep pad or anti-fog cleaning pad. |
| 4. | Visualize presence of air / fluid level within sinus. |
| a. | If fluid level impedes endoscopic visualization, aspiration and/or irrigation may be required. |
| 1108-004 Rev C May 2010 | FinESS® Sinus Treatment | Page 7 of 11 |
| b. | To Irrigate, fill a 60 cc syringe with Sterile Saline Solution and purge air. Connect the syringe to the FinESS® Endoscope balloon port and flush with saline. |
| c. | Verify acceptable fluid level. Excess residual saline in the sinus should be gently aspirated through a standard #5 suction device. |
| 5. | Visualize the maxillary sinus ostium. |
| a. | While holding the Access Sheath in the access site, gently manipulate the Endoscope to visualize the maxillary sinus ostium. |
| b. | While visualizing the ostium, topical anesthetic may be sprayed through the Endoscope for additional topical anesthesia as required. |
| Note: | Use suction to remove residual anesthetic from Endoscope using either a standard #5 tip or connecting the suction to directly to the balloon port of the Endoscope. |
| 6. | Introduce the Balloon Catheter through the FinESS® Endoscope. |
| Note: | The Balloon Catheter should be tracked through the FinESS® Endoscope while under vacuum from the Inflation Device. |
| 7. | Advance the Balloon across the ostium under endoscopic visualization. |
| a. | When the Balloon Catheter tip is positioned just outside of the ostium, advance the balloon into the sinus ostium with the curved catheter tip pointed posterior / inferior. |
Note: The arrow on the Balloon Catheter hub indicates the direction of the tip curve.
| b. | Using the Shaft Marker (see Figure 3) as a visual reference for the proximal balloon end, position the Balloon within the ostium / infundibulum. |
Note: The Balloon Catheter may be rotationally steered to allow full insertion of the balloon into the ostium and infundibulum.
| 8 | Inflate Balloon. |
| a. | Slowly depress the plunger rod with 2 hands, keeping the plunger rod straight, to inflate the balloon. The pressure should be increased slowly (3 – 5 seconds) until the distal seal on the orange piston reaches the distal mark on the inflation device. |
| Note: | Do not use air or any gaseous medium to inflate the balloon. |
| b. | Inflate sinus balloon until desired result is achieved. Endoscopically observe balloon dilation. |
| Note: | Do not exceed the maximum pressure of 12 atm. |
| c. | After balloon dilation is complete, deflate the sinus balloon by gently pulling back on the plunger rod. Confirm the balloon deflation endoscopically. |
| d. | Lock the plunger rod in place by pulling it back to the stop position. The stop will prevent the plunger rod form being removed from the inflation device. |
| e. | Verify the FinESS® Endoscope Is seated against the Access Sheath Spacer or Access Sheath to ensure the Endoscope tip is inserted beyond the Access Sheath. |
| f. | Withdraw balloon from Endoscope under endoscopic visualization. |
| Note: | Rotating the Catheter as the Balloon begins to engage the Endoscope will assist in balloon withdrawal. |
| 9. | Endoscopically observe balloon dilation result. |
| a. | If the maxillary sinus ostium has been adequately dilated, remove Endoscope and Access Sheath from access site. |
| Note: | Adequate dilation can be visually confirmed by observing the balloon during Inflation, visually verifying balloon positioning during inflation, and ensuring that the recommended Inflation pressure is achieved. |
| 1108-004 Rev C May 2010 | FinESS® Sinus Treatment | Page 8 of 11 |
| b. | If additional balloon dilation is required, prepare Balloon Catheter per step 10 and repeat steps for Balloon inflation. |
| 10. | Prepare Balloon Catheter for additional dilations (if required). |
| a. | Gently advance the plunger rod into the syringe barrel to expand the balloon using minimal pressure. |
| b. | Rinse balloon with sterile saline or water. |
| c. | Wipe balloon dry using gauze pad. |
| d. | Point the distal tip of the balloon catheter down. Gently pull back on the plunger rod to apply vacuum to the balloon. Lock the plunger rod by pulling it back to the stop position. |
| e. | Re-wrap the tri-folded balloon by gently folding the wings around the catheter shaft in a clockwise direction. |
| 11. | Repeat procedure for contralateral maxillary sinus if needed. |
| 12. | After completing the entire procedure, withdraw all system components. Discard FinESS® Sinus Treatment System components and set FinESS® Endoscope aside for reprocessing. |
| 1108-004 Rev C May 2010 | FinESS® Sinus Treatment | Page 9 of 11 |
Limited Warranty
Entellus Medical, Inc. warrants that reasonable care has been used in the design and manufacture of the FinESS® Sinus Treatment system. This limited warranty is in lieu of and excludes all other warranties not expressly set forth herein, whether expressed or implied, written or oral, by operation of law or otherwise including, but not limited to, any implied warranties of merchantability or fitness for a particular purpose, or warranties arising from a course of dealing or usage or trade. Handling, storage, cleaning and sterilization of the FinESS® Sinus Treatment system, as well as other factors relating to the patient, diagnosis, treatment, medical procedures, and other matters beyond Entellus Medical, Inc.’s control, directly affect the FinESS® Sinus Treatment system and the results obtained from its use. This limited warranty does not extend to any abuse or misuse of the FinESS® Sinus Treatment system (including, without limitation, off-label use), accident to or neglect of the FinESS® Sinus Treatment system, failure to follow any instructions or specifications provided with the FinESS® Sinus Treatment system (including, without limitation, any re-use, re-processing or re-sterilization of the FinESS® Sinus Treatment system not in accordance with such instructions or specifications), in each case whether caused or carried out by Customer or by any third party.
Entellus Medical’s obligation under this limited warranty is limited, at Entellus Medical, Inc.’s option, to the repair or replacement of the FinESS® Sinus Treatment system for a period of twelve (12) months from the date of purchase (the “Warranty Period”) using commercially reasonable efforts within a reasonable period of time. Entellus Medical, Inc. shall not be liable for any incidental or consequential loss, damage or expense directly or indirectly arising from use of the FinESS® Sinus Treatment system. Repair or replacement of the FinESS® Sinus Treatment system shall not extend the term of any applicable warranty and the original term of such warranty shall remain in effect. Repairs, modifications or alterations of the FinESS® Sinus Treatment system performed by any person or entity other than Entellus Medical, Inc. or approved by Entellus Medical, Inc. in writing shall nullify and otherwise void all applicable warranties hereunder.
Entellus Medical, Inc. shall be obligated to honor the express limited warranties contained herein only upon receipt of full payment for the FinESS® Sinus Treatment system or otherwise in accordance with the payment terms agreed to by Entellus Medical, Inc. and Customer.
Entellus Medical, Inc. neither assumes, nor authorizes any other person to assume for it, any other or additional liability or responsibility in connection with the FinESS® Sinus Treatment system.
Limitation of Liability
In no event will either Entellus Medical, Inc. or Customer be liable to the other or to any third party for loss of profit, goodwill or other Indirect, incidental, special or consequential or other similar damages arising out of these Terms and Conditions or any Related Purchase Document. The limitation of liability described in this section is in addition to any limitation provided for by the Limited Warranty provisions.
| 1108-004 Rev C May 2010 | FinESS® Sinus Treatment | Page 10 of 11 |
Symbols

This product is protected by US Patent No. 7,520,876. Other US Patents Pending.
©2009 Entellus Medical. All rights reserved. FinESS is a registered trademark of Entellus Medical.

| 1108-004 Rev C May 2010 | FinESS® Sinus Treatment | Page 11 of 11 |
Exhibit 6

FinESS™ Endoscope
(3.2mm 0°)
INSTRUCTIONS FOR USE
ALL INSTRUCTIONS, PRECAUTIONS AND WARNINGS SHOULD BE CAREFULLY READ AND UNDERSTOOD
BEFORE USE. FAILURE TO DO SO MAY RESULT IN COMPLICATIONS AND WILL VOID ANY EFFECTIVE
WARRANTY.
Caution: Federal (USA) law restricts this device to sale by or on the order of a physician.
DESCRIPTION
The Entellus Medical FinESS Endoscope has the following features:
| • | The FinESS Endoscope has a 3.2mm outer diameter, a 0° direction of view, and a 1.75mm internal diameter working channel. |
| • | The working length of the endoscope is 60mm |
| • | The Eye Cup of the endoscope is compatible with standard “B” mount camera couplers. |
| • | The endoscope is compatible with standard light cables and adapters |
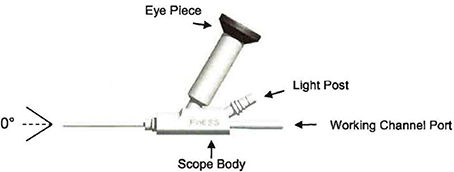
INDICATION FOR USE
The FinESS Endoscope is intended to provide a means to visualize the maxillary sinus cavity and deliver the FinESS balloon dilation catheter to treat the maxillary sinus ostium and the ethmoid infundibulum in adults with a trans-antral approach.
CONTRAINDICATIONS
The use of endoscopes is not permissible in situations where endoscopic procedures are contraindicated for medical reasons.
WARNINGS
| • | The FinESS Endoscope is provided NON-STERILE and must be sterilized or high level disinfected prior to its first use and every subsequent use (see Care & Handling, Cleaning, High Level Disinfection, and Sterilization Instructions sections). Cleaning, Disinfection, and Sterilization of this product must be performed by staff skilled in the reprocessing of medical devices following the directions and guidelines provided. Refer to http://www.cdc.gov/ncidod/dhqp/bp_sterilization_medDevices.html for the CDC document titled “Sterilization or Disinfection for Medical Devices” for general information about preventing the spread of infection for reusable devices. |
| 1577-001-Draft2 Jan 13 2011 | FinESS Endoscope | Page 1 of 9 |
WARNINGS cont.
| • | Do not sterilize the FinESS Endoscope in an autoclave or other types of steam sterilization. Exposure to temperatures greater than 65°C (150°F) may damage the device. |
| • | Do not clean the FinESS Endoscope with ultrasonic cleaning. Ultrasonic cleaning can permanently damage the endoscope lenses and fiber optic components. |
| • | Do not use an endoscope disinfected with CIDEX® OPA on patients with CIDEX OPA sensitivity. |
| • | Do not use a FinESS Endoscope that has been damaged. Use of equipment that is not in good working condition may compromise patient safety. |
| • | Do not use reprocessing chemicals or channel cleaning instruments that are not specified in these instructions for use. Use of these chemicals or channel cleaning instruments may result in damage to the endoscope or may reduce the effectiveness of the disinfection or sterilization process. |
| • | Do not use the FinESS Endoscope with a xenon light source > 300W or a light guide (cable) > 5mm in diameter. High energy light radiated through endoscopes can result in high temperatures in front of the light outlet and at the connection point with the light cable, including the light guide adapters. Use of a higher wattage light source or larger diameter cable may result in bums or permanent tissue damage to the user or the patient. |
| • | Allow the endoscope system to cool for a few minutes before disassembling the endoscope from the light guide adapter and light guide cable. |
PRECAUTIONS
| • | Clean and disinfect or clean and sterilize the FinESS Endoscope prior to its first use and every subsequent use per the included Cleaning, Disinfection and Sterilization Instructions. If high level disinfection is the method chosen, this step must be performed immediately prior to use on a patient. |
| • | Observe the exposure times discussed in the Cleaning and Disinfection sections. The FinESS Endoscope may become slightly discolored by over-exposure to ENZOL® Enzymatic Detergent (if soaked longer than 8 hours) or CIDEX OP A Solution (if soaked longer than 7 days). The potential discoloration will not alter the function of the instrument. |
| • | Inspect the FinESS Endoscope prior to each use for signs of wear and tear, damage, or failed or degraded image quality. Discontinue the use of an endoscope with severe bends, signs of corrosion, mechanical damage to the optical components at the tip, degraded or cloudy image quality or a complete loss of image. These devices should not be used and should be sent to the manufacturer for replacement, disposal, or repair. Consult the Return for Service section of this document for customer service contact information. |
| • | Use only non- or semi-abrasive instruments (FinESS balloon dilation catheter and cleaning brushes) that fit within the 1.75 mm working channel of the FinESS Endoscope. Sharp or abrasive metal instruments may damage the working channel of the endoscope. |
| • | Only use cleaning brushes listed in the Recommended Supplies section. Use of other brushes has not been tested and may damage device. |
| 1577-001-Draft2 Jan 13 2011 | FinESS Endoscope | Page 2 of 9 |
PRECAUTIONS cont.
| • | Use solutions that are non corrosive to surgical stainless steel in the working channel. This includes 70% isopropyl alcohol, Enzol enzymatic detergent, Cidex OPA disinfectant and STERRAD processing agents. |
| • | Connect the FinESS Endoscope to a camera prior to each use to ensure the FinESS Endoscope projects an acceptable image. A cloudy image is a sign that a leak may have occurred in the endoscope. |
| • | Do not use the FinESS Endoscope with an endo sheath. |
| • | If the FinESS endoscope is dropped, contact a representative to assess if the endoscope is acceptable for use. Alternatively, return the endoscope to Entellus Medical for assessment using the guidance provided in the Return for Service section. |
| • | Do not hang the FinESS Endoscope in a storage cabinet or store in a tray other than the recommended storage tray. |
| • | Do not store the FinESS Endoscope or light post adapters in the foam-lined shipping box between uses because the foam liners can retain microbes. |
RECOMMENDED SUPPLIES
| • | Sterile water |
| • | Sterile gauze pads or sterile disposable cloth |
| • | Sterile Anti fog pads |
| • | ENZOL® detergent for cleaning |
| • | CIDEX® OPA Solution for high level disinfection if desired |
| • | Sterile plastic syringes with a male luer lock or luer slip tip for cleaning and disinfecting |
| • | Disposable 5 mm nylon brush, ³ 7 inches long Cat# TR350354, HealthMark Industries for cleaning (or equivalent) |
| • | Syringe with ³ 20 mL volume capacity having either a male luer lock or a luer slip tip |
| • | Instrument tray approved for use in the STERRAD® NX™ sterilizer |
| • | FinESS Sinus Treatment |
Equipment for Imaging Enhancement
| • | Use a xenon light source with at least 150W but no more than 300W in power. |
| • | Use a light guide (cable) that is at least 3.5 mm but not more than 5mm in diameter. |
| • | A high definition camera system and a ³19” display is recommended. High definition camera systems with image enhancement options (i.e. – gain, zoom adjustment) are preferred for optimum viewing. |
| • | For options on enhancing the projected image refer to the Instructions for Use supplied with camera, light source and display. |
CARE AND HANDLING
| • | The FinESS Endoscope is constructed with glass fiberoptic and lens components. Special care must be taken to prevent damage to the optics and to maintain optimal functionality and longevity of the endoscope. |
| • | Protect the endoscope system during procedural use and transportation between the procedural room and reprocessing location. A void harmful interaction with other surgical |
| 1577-001-Draft2 Jan 13 2011 | FinESS Endoscope | Page 3 of 9 |
| instruments or tools. The FinESS Endoscope contains glass optics that may be damaged if misused. |
| • | Periodically inspect (10X magnification) the lens in the distal tip of the endoscope for signs of mechanical damage such as chipping, pitting, cracks, or nicks. Discontinue use of the endoscope or return to the manufacturer if damage is noted. |
COMPATIBILITY
The FinESS Endoscope is compatible with the FinESS balloon dilation catheter and the FinESS access sheath. Please refer to the FinESS Sinus Treatment Instructions for Use for detailed information and instructions on the use of the FinESS Sinus Treatment system. The FinESS Endoscope is not compatible with the XprESS Multi Sinus Dilation Tool.
INSTRUCTIONS FOR USE
| 1. | Verify that endoscope has been cleaned and disinfected or cleaned and sterilized. |
| 2. | Inspect the working lumen of the FinESS Endoscope to assure it is free of obstruction. |
| 3. | Prior to each use, check the image quality. If the picture is blurry and does not clear using standard cleaning methods, do not use the endoscope and contact Entellus Medical for servicing of the endoscope. |
| 4. | Connect the endoscope to the selected light source and camera using one of the adaptors provided, if necessary. |
| 5. | The FinESS Endoscope is introduced through the opening of the FinESS access sheath and guided under direct visualization assisted by video system. Please refer to the FinESS Sinus Treatment Instructions for Use for detailed information and instructions on the use of the FinESS Sinus Treatment system. |
| 6. | The FinESS balloon dilation catheter is introduced through the FinESS Endoscope working channel. Please refer to the FinESS Sinus Treatment Instructions for Use for detailed information and instructions on the use of the FinESS Sinus Treatment system. |
| Note: | If suction or irrigation is desired during the procedure, remove the FinESS Endoscope from the sinus and perform standard irrigation or suction techniques. |
CLEANING, DISINFECTION, AND STERLILIZATION INSTRUCTIONS
Pre-Cleaning (Immediately After Use)
| 1. | Remove heavy soil from the endoscope by wiping the exterior with a wet (using sterile water) disposable cloth. |
| 2. | Aspirate sterile water through the working channel until the rinsed solution is visibly free of organic matter (standard suction may be used). If the working channel becomes plugged, use the recommended nylon brush to clean debris out of the channel. |
| 3. | Transfer to the cleaning location for further cleaning and reprocessing as soon as possible. |
Cleaning (Prior to Disinfection or Sterilization)
The FinESS Endoscope must be cleaned with an enzymatic cleaner I detergent (ENZOL® Enzymatic Detergent is recommended) to remove all tissue, materials and debris prior to initial use; immediately after every procedural use; and before disinfection or further reprocessing.
All instructions provided by the enzymatic detergent manufacturer and provided below must be carefully followed.
Note: The entire FinESS Endoscope is submersible.
| 1577-001-Draft2 Jan 13 2011 | FinESS Endoscope | Page 4 of 9 |
| 1. | Wear all manufacturer recommended personal protective clothing / equipment when performing any cleaning procedure. |
| 2. | Use fresh cleaning solutions for each cleaning. |
| 3. | Prepare the enzymatic cleaner/detergent following the manufacturer’s instructions (for ENZOL, use 1 ounce/gallon of water; if there is dried on organic soil on endoscope use 2 ounces/gallon and/or warm water.) Ensure there is sufficient enzymatic solution to fully submerge the endoscope. |
| 4. | Disconnect the light post adapter(s) from the endoscope (if present) by rotating it counter-clockwise in relation to the endoscope. |
| 5. | Fully Immerse the endoscope and light post adaptors into the detergent solution. |
| • | While fully submerged, use the recommended syringe to flush the working channel with approximately 20cc of the enzymatic solution and let it soak. |
| 6. | Soak the endoscope and light post adapters in the enzymatic cleaning solution for the recommended soak time provided by the enzymatic detergent manufacturer. For ENZOL, a minimum soak time of 1 minute is recommended. If endoscope has dried-on organic matter, extend soak time while performing step 7 below. Total soak time may take approximately 5-6 minutes if endoscope has dried-on organic matter. |
| 7. | While fully submerged, clean the endoscope and light adaptors, paying close attention to the distal segment and the working channel. |
| • | Wipe the entire external portion of the endoscope and adapters using a cloth or towel while the endoscope and adapters are submerged in the enzymatic detergent solution. Heavily soiled areas can be scrubbed with the recommended nylon brush. |
| • | Wipe the distal end containing the lenses gently, but thoroughly, with the cloth or towel to remove any contaminants remaining on the endoscope. |
| • | Clean the inner diameter of the working lumen of endoscope and lumen of adapters using the recommended nylon brush. While the endoscope is submerged, insert the brush through the hub of the endoscope and advance it until the bristles of the brush extend out past the distal end of the endoscope. Remove any visible debris from the brush and pull back through the working lumen until completely removed. Clean any residual debris from the brush between passes through the lumen. |
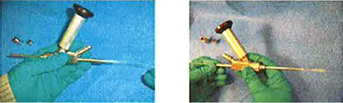
Note: The pictures are for illustration only. Brushing should be done with the endoscope fully submerged.
| • | Repeat the brushing of the working lumen until no visual signs of debris are present on the brush. |
| • | Brush the adapter lumens with a circular motion combined with a back and forth motion until no visible signs of debris are present on the brush. |
| 8. | Thoroughly rinse the outside of the endoscope and the light adaptors with water and aspirate at least 100cc of water through the lumen. Dionized or de-mineralized water is recommended. |
| 9. | Dry the devices using low pressure, filtered air. Purge the working lumen with air until all visible water is removed. Note: The endoscope can withstand air pressure of up to 70 psi while drying. The endoscope may also be purged with air using the recommended syringe if house air is not available. |
| 10. | Manually dry the external portions of the endoscope and adapters with a clean absorbent cloth or towel. |
| 1577-001-Draft2 Jan 13 2011 | FinESS Endoscope | Page 5 of 9 |
| 11. | Discard the enzymatic cleaner and the disposable cleaning brush used on the FinESS Endoscope after a single use. |
| 12. | Store cleaned endoscope in a clean container or instrument tray capable of securing and isolating the endoscope from other instruments. The container or instrument tray should be oriented with the endoscope vertical during storage. See “Storage Between Use” section for more details. |
| High | Level Disinfection |
The FinESS Endoscope can be disinfected with the manual high level disinfection process using the CIDEX® OPA Solution (i.e., 0.55% ortho-phthaldehyde). Follow all instructions provided by the manufacturer of CIDEX OP A Solution when performing the disinfection process. The recommended temperature for CIDEX OPA Solution is a minimum of 20° C or 68° F. Disinfect scope immediately prior to use.
Note: The entire FinESS Endoscope is submersible.
| 1. | Wear all manufacturer recommended personal protective clothing I equipment prior to performing disinfection with CIDEX OPA Solution. |
| 2. | Add the CIDEX OPA Solution into a compatible disinfection container. Ensure that there is sufficient CIDEX OPA solution to completely submerge the endoscope. |
| 3. | Confirm that the concentration of the disinfectant meets the minimum effective value using the test strip specified by the manufacturer prior to each use. |
| 4. | Ensure that the endoscope and light post adapters have undergone a cleaning process with an enzymatic detergent prior to the disinfection. |
| 5. | Disconnect the light post adaptor(s) from the endoscope (if attached) by rotating it counter-clockwise in relation to the endoscope. |
| 6. | Fully Immerse the endoscope and light post adaptors into the Cidex OP A Solution. |
| • | While fully submerged, use the recommended syringe to flush the working channel with approximately 20cc of the Cidex OPA Solution and let it soak. |
| 7. | Soak the endoscope and light post adapters in the Cidex OPA Solution for the minimum time recommended by the manufacturer (at least 12 minutes). The disinfectant should entirely fill the channel to have full contact for the full 12 minute minimum. |
| 8. | Rinse the light post adapters and the FinESS Endoscope |
| • | Fully submerse the endoscope and light post adapters in a minimum of 2 gallons of sterile water for at least one minute. |
| • | Flush the working channel with at least 100cc of sterile water using the recommended syringe. |
| • | Remove the endoscope and light post adapters and discard the rinse water. |
| 9. | Repeat step 8 TWO additional times for a total of 3 rinse cycles using fresh water for each cycle. |
| 10. | Dry the outside of the device by using low pressure, filtered air or with a sterile wipe or cloth. Note: The endoscope can withstand air pressure of up to 70 psi while drying. |
| 11. | Flush the working lumen with 70% isopropyl alcohol (IPA) until the IP A can be seen exiting the opposite end of the endoscope. |
| 12. | Flush the working lumen with low pressure, filtered air (or syringe air) until no liquid can be seen exiting the lumen. |
| 13. | Remove residual fluid from the lenses of the FinESS Endoscope with a sterile alcohol wipe (if needed). |
| 14. | Dry the light post adapters and the FinESS Endoscope using a sterile towel or cloth. |
| 1577-001-Draft2 Jan 13 2011 | FinESS Endoscope | Page 6 of 9 |
Sterilization
The FinESS Endoscope may be sterilized with the STERRAD® NXTM Advanced Cycle process. Follow all instructions for use provided for the STERRAD NX Advanced Cycle settings by Advanced Sterilization Products (ASP), Division of Ethicon Inc., a Johnson & Johnson company, to load the sterilization chamber, to sterilize the FinESS Endoscope, to maintain sterility of the FinESS Endoscope and for proper aseptic presentation to the surgical field.
The FinESS Endoscope may be sterilized with the STERRAD® NXTM Advanced Cycle process. Follow all instructions for use provided for the STERRAD NX Advanced Cycle settings by Advanced Sterilization Products (ASP), Division of Ethicon Inc., a Johnson & Johnson company, to load the sterilization chamber, to sterilize the FinESS Endoscope, to maintain sterility of the FinESS Endoscope and for proper aseptic presentation to the surgical field.
| • | Assure that the endoscope and light post adapters have undergone a cleaning process prior to conducting the sterilization process. |
| • | Sterility can only be assured if the instructions provided for performing the STERRAD® process (supplied by Advanced Sterilization Products (ASP®) are followed. |
| • | Only use containment devices approved for use in the STERRAD® NX™ sterilizer. |
| • | Monitor the effectiveness of the sterilization process with a biological indicator approved for use with the STERRAD® NX™ Advanced Cycle. |
The following sterilization supplies were included in the sterilization validation for the FinESS Endoscope:
| • | STERRAD® Instrument Tray PC 13837 |
| • | STERRAD® Silicone Mat PC 99211 |
| • | STERRAD® Chemical Indicator Strip PC 14100 |
| • | Test Organism: G. stearothermophilus BI coupons and discs |
| • | STERRAD® Sterilization Pouch (Tyvek Pouches) |
The STERRAD® NX™ Sterilizer uses a hydrogen peroxide gas plasma sterilization process which is well suited for thermo- sensitive items. In plasma sterilization, it is possible for the surfaces of aluminum alloys to discolor. The metal, cylindrical portion of the endoscope eye piece is fabricated from anodized aluminum. The potential discoloration to this component will not alter the function of the instrument.
| Note: | There are limits regarding the size, length and material of instruments with lumens which may be sterilized using STERRAD®. Verify the compliance of the endoscope instrument with the instructions provided for the STERRAD® NX™ Sterilizer. |
HOW SUPPLIED
The FinESS Endoscope is supplied non-sterile and must be sterilized before its first and every subsequent use. The items packaged with the FinESS Endoscope include the Instructions for Use and 2light post adapters. Retain the light post adapters with the endoscope for use with various configuration light cables (i.e. ACMI, Wolf, Storz, Olympus).
STORAGE BETWEEN USE
Do not hang the FinESS Endoscope in a storage cabinet or store in a tray other than the recommended storage tray.
Adhere to the following for the storage of the FinESS Endoscope after cleaning:
| • | Store individual endoscopes in separate clean containers. Interaction with other instruments may cause damage to the endoscope and reduce the useful lifespan. Any general instrument tray capable of securing and isolating the FinESS Endoscope from other instruments may be used to store the scope. The container or instrument tray should be oriented with the endoscope vertical during storage. |
| 1577-001-Draft2 Jan 13 2011 | FinESS Endoscope | Page 7 of 9 |
| • | If a dirty endoscope (un-cleaned) was accidently stored in the instrument tray, or the tray is visibly dirty, clean and disinfect or clean and steam sterilize the tray before further use. |
If high level disinfection is the method chosen, the step should be performed immediately prior to use on the patient. Storage in a tray does not maintain the level of disinfection. Thus, a high level disinfected endoscope placed into a clean tray, must be reprocessed again before use on a patient.
If sterilization by the STERRAD NX process is chosen, follow the Sterrad instructions to maintain sterility of the endoscope between uses. Use a reprocessing tray for storing and sterilizing the FinESS Endoscope that complies with the STERRAD process and instructions.
WARRANTY ASSESSMENT / RETURN FOR SERVICE
If an endoscope becomes damaged or fails to project an image take the following actions to have the scope assessed for warranty coverage or replacement.
Contact Customer Service. Describe malfunction.
Phone: (866) 620-7615
Fax: (866) 620-7616
If returning devices for assessment all products must be cleaned and either disinfected or sterilized prior to shipping per one of the approved methods described within this document. Documentation must be provided stating the device has been reprocessed prior to shipping.
Limited Warranty
Entellus Medical, Inc. warrants that reasonable care has been used in the design and manufacture of the Entellus Medical FinESS Endoscope. This limited warranty is in lieu of and excludes all other warranties not expressly set forth herein, whether expressed or implied, written or oral, by operation of law or otherwise including, but not limited to, any implied warranties of merchantability or fitness for a particular purpose, or warranties arising from a course of dealing or usage or trade. Handling, storage, cleaning and disinfection of the Entellus Medical FinESS Endoscope, as well as other factors relating to the patient, diagnosis, treatment, medical procedures, and other matters beyond Entellus Medical, Inc.’s control, directly affect the Entellus Medical FinESS Endoscope and the results obtained from its use. This limited warranty does not extend to any abuse or misuse of the Entellus Medical FinESS Endoscope (including, without limitation, off-label use), accident to or neglect of the Entellus Medical FinESS Endoscope, failure to follow any instructions or specifications provided with the Entellus Medical FinESS Endoscope (including, without limitation, any re-use, re-processing or disinfecting of the Entellus Medical FinESS Endoscope not in accordance with such instructions or specifications), in each case whether caused or carried out by Customer or by any third party.
Entellus Medical’s obligation under this limited warranty is limited, at Entellus Medical Inc.’s option, to the repair or replacement of the Entellus Medical FinESS Endoscope for a period of twelve (12) months from the date of purchase (the “Warrantv Period”) using commercially reasonable efforts within a reasonable period of time. Entellus Medical, Inc. shall not be liable for any incidental or consequential loss, damage or expense directly or indirectly arising from use of the Entellus Medical FinESS Endoscope. Repair or replacement of the Entellus Medical FinESS Endoscope shall not extend the term of any applicable warranty and the original term of such warranty shall remain in effect. Repairs, modifications or alterations of the Entellus Medical FinESS Endoscope performed by any person or entity other than Entellus Medical, Inc. or approved by Entellus Medical Inc. in writing shall nullify and otherwise void all applicable warranties hereunder.
Entellus Medical, Inc. shall be obligated to honor the express limited warranties contained herein only upon receipt of full payment for the Entellus Medical FinESS Endoscope or otherwise in accordance with the payment terms agreed to by Entellus Medical, Inc. and Customer.
Entellus Medical Inc. neither assumes, nor authorizes any other person to assume for it, any other or additional liability or responsibility in connection with the Entellus Medical FinESS Endoscope.
| 1577-001-Draft2 Jan 13 2011 | FinESS Endoscope | Page 8 of 9 |
Limitation of Liability
In no event will either Entellus Medical Inc. or Customer be liable to the other or to any third party for loss of profit, goodwill or other indirect, incidental, special or consequential or other similar damages arising out of these Terms and Conditions or any Related Purchase Document. The limitation of liability described in this section is in addition to any limitation provided for by the Limited Warranty provisions.
Graphic Symbols Contained on Device labeling
Manufactured for:
Entellus Medical Inc.
6705 Wedgwood Court North
Maple Grove, MN 55311
(763) 463-1595
www.entellusmedical.com
U.S. and Foreign patents pending.
| 1577-001-Draft2 Jan 13 2011 | FinESS Endoscope | Page 9 of 9 |
Exhibit 7


Multi-Sinus Dilation Tool
INSTRUCTIONS FOR USE
ALL INSTRUCTIONS, PRECAUTIONS AND WARNINGS SHOULD BE CAREFULLY
READ AND UNDERSTOOD BEFORE USE. FAILURE TO DO SO MAY RESULT IN
COMPLICATIONS.
Please check annually for updates to these Instructions
All packaging and referenced Entellus Medical device components are
LATEX FREE
Caution - Federal (USA) law restricts this device to sale by or on the order of a physician.
IF YOU DESIRE A COMPLIMENTARY HARD COPY OF THESE INSTRUCTIONS,
PLEASE CALL OUR CUSTOMER SERVICE DEPARTMENT AT 866-620-7615
OR FAX YOUR REQUEST TO 866-620-7616.
| 1662-001-rG Oct 2010 | XprESS Multi-Sinus Dilation Tool | Page 1 of 9 |
Description
The XprESS Multi-Sinus Dilation Tool is intended to remodel or recreate the sinus outflow tract via trans-nasal balloon dilation. The XprESS device combines features of a curved suction tip and a frontal ostium seeker with the tissue expansion effect of balloon dilation. The familiar features of this device enable a physician to track the device to the sinus ostium. Since the distal end of the device is re-shapeable, one balloon can be modified to work on multiple sinuses within the same patient.
The XprESS Multi-Sinus Dilation Tool has been tested to withstand multiple inflations and device tip manipulations (up to 25) in a surgical case wherein all 6 sinus ostia are being dilated.
The XprESS device curved suction tip has a 2 mm atraumatic ball tip with a 1 mm inside diameter. A suction tube may be connected to the proximal barbed fitting to provide active suction.

Figure 1 – XprESS Multi-Sinus Dilation Tool
The XprESS Multi-Sinus Dilation Tool is provided sterile and for single use only.
The items packaged with the Xpress Multi-Sinus Dilation Tool include the Inflation Device and the Infusion Line.
Indication for Use
To access and treat the frontal recesses, sphenoid sinus ostia and maxillary ostia/ethmoid infundibula in adults using a trans-nasal approach. The bony sinus outflow tracts are remodeled by balloon displacement of adjacent bone and paranasal sinus structures.
Contraindications
| • | Do not use this XprESS device in patients who are allergic to nickel or barium sulfate. |
| • | Do not attach the XprESS device directly to the CT Image Guidance systems. This may result in inaccurate device positioning. |
Warnings
| • | Never advance or withdraw the XprESS device against any resistance. Do not use excessive force or torque to advance the XprESS device or balloon / slide assembly when positioned in any paranasal space. Such actions could lead to tissue trauma, bleeding, or device damage. |
| • | Do not use breached or damaged packages, since the sterility and functionality of the device may be compromised. |
| • | This XprESS device is provided sterile. Do not re-sterilize because device integrity may be compromised. |
| • | The XprESS device, inflation device and other accessories are intended for single procedure use only. Do not attempt to reuse or re-sterilize because the integrity of the XprESS devices may be compromised. |
| 1662-001-rG Oct 2010 | XprESS Multi-Sinus Dilation Tool | Page 2 of 9 |
| • | Due to the variability of sinus anatomy, review appropriate radiographic imaging (CT scan) prior to treatment. Do not use the XprESS device to treat a hypoplastic/atelectatic maxillary sinus or atelectatic ethmoid infundibulum. |
| • | Do not exceed the maximum recommended balloon inflation pressure of 12 atm. Over-inflation of sinus balloons can result in serious adverse events. |
| • | Do not use ionic or non-ionic fluoroscopic contrast solution to inflate the balloon in patients with known allergies to contrast media. |
| • | If suction through the XprESS device lumen is used during the procedure, temporarily discontinue suction (disconnect suction hose from device, or clamp suction hose) at the time of balloon inflation. Suction can resume subsequent to balloon deflation. Using the XprESS device in suction mode while balloon is inflated may result in barometric trauma to sinus tissue which may lead to increased bleeding. |
| • | As in any upper airway procedure or sinus surgery, do not use CPAP until the physician has confirmed that the tissue is adequately healed. CPAP usage prior to soft tissue healing may result in facial and/or neck swelling due to subcutaneous emphysema. |
| • | Do not clean the XprESS device with anti-microbial agents as the compatibility of the XprESS device with these agents has not been tested. |
| • | The XprESS device has been tested only with the Entellus Inflation Device. Do not use other inflation devices. Use of other inflation devices may result in serious patient injury. |
Precautions
| • | Store the XprESS device components in a cool and dry place. Never use a device that is beyond its expiration date. |
| • | Handle the XprESS device with care. Prior to use, and during the procedure, inspect the packaging and components for bends, kinks, or other damage. Discontinue the use of the XprESS device if it may have been damaged. |
| • | Pay special attention when advancing or withdrawing the balloon and slide assembly. If resistance is encountered, use endoscopy or direct visualization to help guide device out of the paranasal space and then attempt to alleviate the resistance. If the cause of resistance cannot be determined, do not use the XprESS device. |
| • | Use direct endoscope visualization with or without fluoroscopy to ensure accurate placement of the balloon prior to dilation. If balloon location cannot be verified, the balloon should not be inflated. |
| • | Consider using self-limiting radiation exposure equipment when employing fluoroscopy to confirm device placement. Ensure the equipment is calibrated and maintained per the equipment manufacturer’s user manual. |
| • | Use techniques for reducing fluoroscopic exposure when using fluoroscopy. Examples are applying pulsed beam settings, increasing target-to-panel distance, utilizing posterior-anterior projection, or using appropriate lead shield protection. Total fluoroscopy time should be limited to 30 minutes. |
| • | When fluoroscopy is used, minimize radiation dose to the lens of the eye and other proliferating tissues due to the potential of cataract formation or injury to the surrounding tissue. |
| • | Do not advance or withdraw the guidewire through the suction lumen against resistance. This could lead to device damage. |
| • | Use standard larger suction tubes for removal of thick secretions or other materials. |
| • | Fully deflate the balloon and retract the balloon slide assembly before withdrawing the XprESS device from the paranasal sinus space. |
| • | Use liquid contrast or sterile saline solution to inflate the balloon. Use of air will make it difficult to achieve the target inflation pressure. |
| 1662-001-rG Oct 2010 | XprESS Multi-Sinus Dilation Tool | Page 3 of 9 |
| • | Consider using a new balloon if cross-contamination between sinuses is a concern. |
Adverse Effects
Possible adverse effects include, but are not limited to, the following:
| • | Complication from anesthesia |
| • | Damage to the lamina papyracea |
| • | Damage of the orbital wall or other structures of the eye |
| • | Cerebrospinal fluid leak |
| • | Loss of vision or diplopia (double vision) |
| • | Temporary or permanent facial / nasal pain |
| • | Epistaxis |
| • | Cavernous sinus syndrome |
| • | Damage to the lacrimal sac affecting tearing |
| • | Pneumocephalus |
| • | Facial bruising and swelling |
| • | Tissue inflammation |
| • | Fever and infection |
| • | Continued or worsening sinus symptoms |
| • | Revision surgery |
Supplies
The following supplies need to be available and prepped prior to use of the XprESS Multi-Sinus Dilation Tool.
Note: These supplies are not provided with the XprESS Multi-Sinus Dilation Tool.
| • | Appropriate endoscopes and compatible camera system |
| • | >50 cc of sterile saline solution or sterile fluoroscopic contrast solution |
| • | Needles and syringes as required for injections |
| • | Suction system |
| • | Other supplies or medication as per established laboratory protocol |
| • | If the use of a sterile guidewire is desired, the recommended guide wire should be made of metal, sterile, straight or curved, and 0.035 inches in diameter with a minimum length of 50 cm. Examples of guidewires that meet these requirements include the Vigor™ Sinus Guidewire and the Relieva Luma™ Sinus Illumination System guidewire, both available from Acclarent, Inc. |
| • | Bowl containing > 50 cc of sterile saline for prepping the inflation device, infusion line, and inflating the balloon. |
Optional Equipment
| • | Standard CT image guidance system and tools (Do not attach directly to XprESS device) |
| • | Fluoroscopy may be used in conjunction with the endoscope if desired. |
| • | Refer to appropriate Instructions for Use and safety procedures when preparing and using equipment. |
System Preparation
| 1. | Prepare Entellus Medical Inflation Device and Infusion Line. |
| a. | Remove the Inflation Device and the Infusion Line from the sterile package. |
| b. | Connect the Infusion Line to the Inflation Device. |
| c. | Insert the luer fitting of the Infusion Line into sterile saline solution. Keep the Inflation Device luer pointed up during the prepping steps to prevent air entrapment. |
| d. | Fully retract the plunger rod to the stop position (2nd Detent) as shown in Figure 2. This will fill the barrel with the saline solution. |
| 1662-001-rG Oct 2010 | XprESS Multi-Sinus Dilation Tool | Page 4 of 9 |
| e. | Advance the plunger rod fully into the syringe barrel to purge air from the system. |
| f. | Repeat steps d and e until no more air is present in the system. |
| g. | With the XprESS device full of saline and the plunger fully retracted (to stop position), advance the plunger to the first detent (Figure 3). The Inflation device is now ready to be connected to the balloon. |
| Note: | Inspect the syringe barrel to ensure there is minimal air in the system. If excessive air remains in the system, repeat prepping process. |
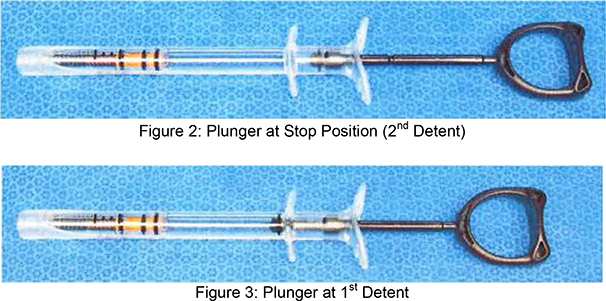
| 2. | Prepare XprESS Multi-Sinus Dilation Tool. |
| a. | Remove the XprESS device from its sterile package. |
| b. | Connect the prepped Inflation Device Infusion Line to the balloon inflation luer. |
| c. | Remove and discard the balloon protector prior to introducing the balloon into the sinus. |
| 3. | Perform a test inflation of the system depressing the plunger rod with 2 hands, keeping the plunger rod straight. Ensure that the distal orange piston black O-ring seal is aligned with the distal black mark of the Inflation Device during the test inflation (See Figure 5). Also ensure there is no air introduced into the system during the deflation of the balloon. If a leak is detected and the source cannot be identified and corrected, discard the XprESS device, infusion line, and inflation device. Use new devices to complete the procedure. |
| 4. | Pull back on the plunger rod to the stop (2nd Detent) position to apply a vacuum to the balloon. |
Patient Preparation.
| 1. | Patient preparation should be consistent with standard practice. |
| 2. | Anesthesia should be administered appropriately to allow patient tolerance. |
Locate the Sinus Structure
| 1. | Direct Visualization: Locate the treatment area or sinus structure using the standard sinus ostium seeker, suction tube (standard or XprESS) and/or guidewire with the aid of an endoscope. Observe the location of the treatment area relative to the anatomical landmarks through the endoscope. Remove the sinus ostium seeker, suction tube or guidewire after locating treatment area. When treating the maxillary sinus ostia, removal of a portion of the uncinate process may be required to achieve direct visualization. |
| 1662-001-rG Oct 2010 | XprESS Multi-Sinus Dilation Tool | Page 5 of 9 |
| 2. | CT Image Guidance: If further confirmation of the treatment area location is desired, CT Image guidance using standard image guidance tools may be used. If CT image guidance is used, the CT scan data should be uploaded into the image guidance system prior to the start of the procedure. Use only the tools recommended by the CT image system manufacturer. Do not attach the CT Image Guidance system to the XprESS device. |
XprESS Multi-Sinus Dilation Tool Operation
| 1. | Position device suction tip within the sinus structure. |
| a. | Under endoscopic visualization, track the XprESS device to the same treatment area identified in the section “Locate the Sinus Structure”. |
Note: Reference marks are located 1 and 2 cm from the tip of the device.
| b. | Fluoroscopy: If further verification of the device placement prior to dilation is desired, fluoroscopy may be used. Take two orthogonal views (AP and lateral) of the sinus. The XprESS device suction tip is made up of stainless steel and is visible under fluoroscopy. The balloon will be proximal to the tip of the device. |
| c. | To further enhance visualization under fluoroscopy, insert the flexible end of the selected 0.035” guidewire through the suction lumen (see Supplies Section for compatible guidewire). Feed the guidewire through the lumen (device is approximately 27 cm in length) until the flexible tip exits the XprESS device. If resistance in the guidewire is met, reposition the XprESS device so that the guidewire can pass freely out the distal end of the lumen. If suction was used through the suction lumen prior to guidewire advancement, clean the suction lumen by irrigating with sterile saline. |
Note: The XprESS device suction tip may be re-shaped to aid in device positioning.
Note: Use device as a suction tool to maintain a clear visual field during device positioning.
| 2. | Advancing the balloon to the treatment site. |
Under endoscopic visualization, fully advance the balloon slide mechanism forward to position the balloon within the sinus opening.
| 3. | Prior to inflating balloon, discontinue the use of suction to decrease the risk of sinus barotrauma. |
| 4. | Inflate balloon. |
| a | Slowly depress the plunger rod with 2 hands, keeping the plunger rod straight, to inflate the balloon. The pressure should be increased slowly (5–7 seconds) until the orange piston bottoms out (distal black seal (o-ring) of the piston reaches the distal black mark on the inflation device – see Fig. 5). If these do not align, deflate the balloon and remove the XprESS device and perform a test inflation as described in step 3 of the System Preparation section. Alignment of the mark with the 0-ring will ensure that 12 atm of pressure is reached. |
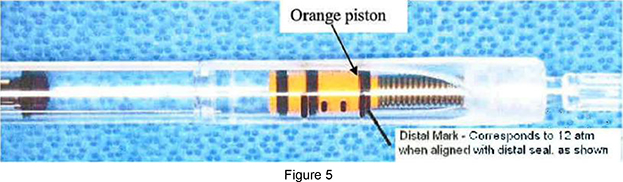
Note: Do not use air or any gaseous medium to inflate the balloon.
| 1662-001-rG Oct 2010 | XprESS Multi-Sinus Dilation Tool | Page 6 of 9 |
| b. | Inflate the balloon until the desired result is achieved or until it reaches 12 atm. Inflate the balloon for up to 20 seconds (less than or equal to 20 second), observe that the balloon is inflated endoscopically. |
Note: Do not exceed 12 atm.
| c. | Deflate the balloon and observe the results endoscopically. Perform additional inflationsfor similar duration if needed until desired result is achieved. Typically 1-2 inflations are performed per sinus. |
| Note: | To avoid barometric trauma to sinus tissue, do not use device in suction mode while balloon is inflated. |
| d. | After balloon dilation is complete, deflate the balloon by gently pulling back on the plunger rod to the stop (2nd detent) position. If air is introduced into the system during deflation, remove the XprESS device and perform a test inflation as described in step 3 of the System Preparation section. |
| e. | Under endoscopic visualization, retract the balloon slide mechanism to withdraw the deflated balloon from the sinus opening. Endoscopically observe balloon dilation result. |
| f. | When the sinus outflow tract has been adequately dilated, remove the XprESS device from the treated sinus. |
| Note: | Adequate dilation can be visually confirmed by observing the balloon during inflation. For a full 12 atm inflation, advance the plunger until the orange piston bottoms out (distal black seal (o-ring) of the piston reaches the distal black mark on the inflation device – see Fig. 5 for Illustration). |
| 5. | Clean up the ostium site by cutting or removing flaps of tissue, fragments of exposed bone, or any other bone and mucosa that may obstruct or otherwise prevent re-establishment of ventilation and drainage of the sinus. |
| 6. | Prepare balloon for dilation of additional sinuses (if desired). |
| a. | Gently advance the plunger rod into the syringe barrel to slightly expand the balloon to remove any wrinkles using minimal pressure. |
| b. | Clean the balloon prior to introduction into another sinus. This may be done by wiping the balloon with sterile wet gauze or dipping the balloon in sterile saline or sterile water. |
| c. | Perform a test inflation of the balloon to ensure system integrity if system or device failure is suspected. Ensure that the distal orange piston black O-ring seal is aligned with the distal black mark of the Inflation Device during the test inflation (See Figure 5 above). Also ensure there is no air introduced into the system during the deflation of the balloon. If a leak is detected and the source cannot be identified and corrected, discard the XprESS device, infusion line, and inflation device. Use new devices to complete the procedure. |
| d. | With the distal tip of the XprESS device down, gently pull back on the plunger rod to the stop (2nd detent) position to apply vacuum to the balloon. |
| 7. | Repeat the same procedure to treat additional sinuses if desired. |
Note: The XprESS device suction tip may be re-shaped as required to treat additional sinuses.
| 8. | After completing the entire procedure, dispose of XprESS device, infusion line, guidewire if used, Inflation Device, and all waste product according to appropriate environmental health safety guidelines. |
How Supplied
The contents of the XprESS Multi-Sinus Dilation Tool are provided sterile and are intended for single-use only.
Do not re-sterilize and/or re-use, as it may result in compromised device performance and risk improper sterilization and cross contamination.
| 1662-001-rG Oct 2010 | XprESS Multi-Sinus Dilation Tool | Page 7 of 9 |
Do not use breached or damaged packages, since the sterility and functionality of the device may be compromised.
The items packaged with the Xpress Multi-Sinus Dilation Tool include the Inflation Device and the Infusion Line.
Limited Warranty
Entellus Medical, Inc. warrants that reasonable care has been used in the design and manufacture of the XprESS Multi-Sinus Dilation Tool. This limited warranty is in lieu of and excludes all other warranties not expressly set forth herein, whether expressed or implied, written or oral, by operation of law or otherwise including, but not limited to, any implied warranties of merchantability or fitness for a particular purpose, or warranties arising from a course of dealing or usage or trade. Handling, storage, cleaning and sterilization of the XprESS Multi-Sinus Dilation Tool, as well as other factors relating to the patient, diagnosis, treatment, medical procedures, and other matters beyond Entellus Medical, Inc.’s control, directly affect the XprESS Multi-Sinus Dilation Tool and the results obtained from its use. This limited warranty does not extend to any abuse or misuse of the XprESS Multi-Sinus Dilation Tool (including, without limitation, off-label use), accident to or neglect of the XprESS Multi-Sinus Dilation Tool, failure to follow any instructions or specifications provided with the XprESS Multi-Sinus Dilation Tool (including, without limitation, any re-use, re-processing or re-sterilization of the XprESS Multi-Sinus Dilation Tool not in accordance with such instructions or specifications), in each case whether caused or carried out by Customer or by any third party.
Entellus Medical’s obligation under this limited warranty is limited, at Entellus Medical, Inc.’s option, to the repair or replacement of the XprESS Multi-Sinus Dilation Tool for a period of twelve (12) months from the date of purchase (the “Warranty Period”) using commercially reasonable efforts within a reasonable period of time. Entellus Medical, Inc. shall not be liable for any incidental or consequential loss, damage or expense directly or indirectly arising from use of the XprESS Multi-Sinus Dilation Tool. Repair or replacement of the XprESS Multi-Sinus Dilation Tool shall not extend the term of any applicable warranty and the original term of such warranty shall remain in effect. Repairs, modifications or alterations of the XprESS Multi-Sinus Dilation Tool performed by any person or entity other than Entellus Medical, Inc. or approved by Entellus Medical, Inc. in writing shall nullify and otherwise void all applicable warranties hereunder.
Entellus Medical, Inc. shall be obligated to honor the express limited warranties contained herein only upon receipt of full payment for the XprESS Multi-Sinus Dilation Tool or otherwise in accordance with the payment terms agreed to by Entellus Medical, Inc. and Customer.
Entellus Medical, Inc. neither assumes, nor authorizes any other person to assume for it, any other or additional liability or responsibility in connection with the XprESS Multi-Sinus Dilation Tool.
Limitation of Liability
In no event will either Entellus Medical, Inc. or Customer be liable to the other or to any third party for loss of profit, goodwill or other indirect, incidental, special or consequential or other similar damages arising out of these Terms and Conditions or any Related Purchase Document. The limitation of liability described in this section is in addition to any limitation provided for by the Limited Warranty provisions.
| 1662-001-rG Oct 2010 | XprESS Multi-Sinus Dilation Tool | Page 8 of 9 |
Symbols
ACCLARENT, RELIEVA, RELIEVA VIGOR, and RELIEVA LUMA are trademarks of Acclarent, Inc.
US Patent Pending.
©2010 Entellus Medical. All rights reserved.

| 1662-001-rG Oct 2010 | XprESS Multi-Sinus Dilation Tool | Page 9 of 9 |
Exhibit 8


Entellus Medical Functional INfundibular
Endoscopic Sinus System.
INSTRUCTIONS FOR USE
ALL INSTRUCTIONS, PRECAUTIONS AND WARNINGS SHOULD BE CAREFULLY
READ AND UNDERSTOOD BEFORE USE. FAILURE TO DO SO MAY RESULT IN
COMPLICATIONS.
Caution – Federal (USA) law restricts this device to sale by or on the order of a physician.
System Description
The Entellus Medical, Inc. Functional INfundibular Endoscopic Sinus System (FinESS™) includes the following components:
Micro-Trocar & Access Sheath
The Micro-Trocar provides a small access hole into the Maxillary Sinus through the Canine Fossa. The Micro-Trocar also delivers the Access Sheath, which is intended to maintain consistent access for procedural devices (Cannula / Endoscope & Balloon Catheter).
Figure 1 – Sinus Access Tools: Micro-Trocar Inserted Through Access Sheath
Cannula
The Cannula is a dual lumen instrument that allows both delivery of the Balloon Catheter and visualization with an Endoscope. The Cannula is sized to pass through the Access Sheath.
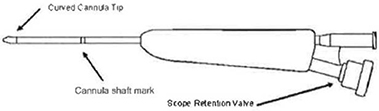
Figure 2 – Sinus Cannula
Balloon Catheter
The Balloon Catheter is designed to dilate the maxillary sinus ostium and the ethmoid infundibulum space. The balloon catheter includes a braided shaft design that allows for rotational positioning to accurately deliver the balloon into the ostium while navigating within the parasinus space.
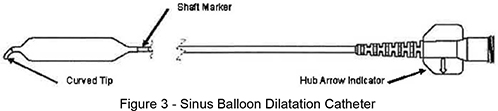
Figure 4 – Imaging Sleeve
Inflation Device
The disposable Entellus Medical, Inc. Inflation Device consists of a 25 cc syringe barrel with a pressure gauge, a threaded plunger assembly with a Winged Lock Mechanism used to generate and control balloon inflation pressures, and a flexible high pressure extension tube. The gauge is calibrated from 0 to 30 atm (0 to 441 psi) of positive pressure. The accuracy of the gauge is within 1 atm over the range. Accuracy of syringe graduations: +5%.
| 1108-001-rG Oct 2010 | FINESS Sinus Treatment | Page 2 of 10 |
All components of the FinESS™ Sinus Treatment are provided sterile.
Indication for Use
To access and treat the maxillary sinus ostium and the ethmoid infundibulum in adults with a trans-antral approach. The bony sinus outflow tract is remodeled by balloon displacement of adjacent bone and paranasal sinus structures.
Contraindications
Patients with thickened polypoid mucosa excessive enough to inhibit the visualization of the maxillary ostium should not be considered candidates for the FinESS Sinus Treatment.
Warnings
| • | Only physicians possessing sufficient skill and expertise in similar technique (accessing maxillary sinus ostium and ethmoid infundibulum through canine fossa) should perform this procedure. |
| • | Do not use the FinESS™ Sinus Treatment if CT image indicates challenging anatomy such as a hypoplastic antrum or polypoid mucosa that may limit success of Canine Fossa approach. |
| • | Do not use opened or damaged packages. |
| • | The FinESS Sinus Treatment is intended for single procedure use only. Do not attempt to reuse or re-sterilize. Device integrity may be compromised. |
| • | Do not apply excessive penetration force when drilling the canine fossa access hole. Patient injury or device damage may occur. |
| • | Do not exceed the maximum recommended balloon inflation pressure (12 atm). Use of a pressure monitoring Inflation Device is required to prevent over-pressurization. |
| • | Do not advance or withdraw the Balloon when inflated. Mucosa damage or device damage may occur. |
| • | Inflation pressures should be closely monitored when inflating the balloon. The inflation device is a high volume, low compliance system capable of generating high pressure with relative ease. |
| • | As in any upper airway procedure or sinus surgery, do not use CPAP for approximately 7 days post-procedure with FinESS™ Sinus Treatment. CPAP usage prior to soft tissue healing may result in facial and/or neck swelling due to subcutaneous emphysema. |
Precautions
| • | FinESS Sinus Treatment components should be stored in a cool and dry place. Never use a device that is beyond its expiration date. |
| • | FinESS Sinus Treatment components should be handled with care. Prior to use, and during the procedure, inspect the packaging and components for bends, kinks, or other damage. Discontinue the use of any component that may have been damaged. |
| • | Pay special attention when advancing or withdrawing the Cannula or Balloon Catheter. Never advance, withdraw or torque any component that meets resistance, as this could cause kinking or breaking. If resistance is encountered, use endoscopy to help guide device manipulation. If the cause of resistance cannot be determined, withdraw all components as a system. |
| • | The Balloon Catheter should only be manipulated under endoscopic observation. |
| • | The Balloon Catheter should be positioned with its curved tip in an inferior orientation when tracking through the maxillary sinus ostium and ethmoid infundibulum to avoid tracking into the agger nasi cell. |
| • | Patients should be advised to sneeze with an open mouth and avoid extreme inhalation and blowing through the nose for approximately 7 days post-procedure to reduce the likelihood of inflammation and/or swelling due to subcutaneous emphysema. |
| 1108-001-rG Oct 2010 | FINESS Sinus Treatment | Page 3 of 10 |
| • | It is important to review the patient’s CT image prior to performing the FinESS procedure in order to determine the most appropriate access location. |
Adverse Effects
Possible adverse effects include, but are not limited to, the following:
| • | Post-operative facial pain |
| • | Excessive bleeding in the nose and at the canine fossa |
| • | Complication from anesthesia |
| • | Fracture of the anterior wall of the maxillary sinus |
| • | Cerebrospinal fluid leak |
| • | Loss of vision or diplopia (double vision) |
| • | Damage to a tooth root or gingiva |
| • | Damage to nerves potentially causing temporary (and occasionally prolonged) numbness to the cheek, lip, or teeth; mid-facial pain; and tooth pain or hypersensitivity |
| • | Facial bruising and swelling |
| • | Swelling of the nose and cheek |
| • | Fever and infection |
| • | Tissue inflammation |
| • | Continued or worsening sinus symptoms |
Supplies
The following supplies need to be available and prepped prior to use of the FinESS™ Sinus Treatment.
Note: These supplies are not provided with the FinESS Sinus Treatment.
| • | Entellus Flexible Endoscope ES-100 (or Storz 0.5 mm Endoscope) and compatible camera system |
| • | Sterile Saline Solution |
| • | 60 cc Syringe (if irrigation is to be performed) |
| • | Needles and Syringes as required for local anesthesia injections |
| • | Suction system |
| • | #5 and #7 Suction Tips |
| • | Other supplies or medication as per established laboratory protocol |
| 1108-001-rG Oct 2010 | FINESS Sinus Treatment | Page 4 of 10 |
System Preparation
| 1. | Prepare Endoscope. |
| a. | Verify endoscope has been disinfected per appropriate instructions. |
Note: The 0.5 mm Endoscope should be handled with care. Avoid stretching or kinking the Endoscope. Device damage may occur.
| 2. | Prepare Cannula. |
| a. | Insert the Endoscope into the Cannula until it is flush with the Cannula tip. |
| b. | Tighten the scope retention valve (see Figure 2) to secure the scope within the Cannula. Verify the Endoscope is flush or just outside (approximately 0.5 mm) of the Cannula. |
| c. | Connect Endoscope to Camera System. |
| d. | While holding the Cannula with the Endoscope Retention Valve positioned down (see Figure 2), rotate the Camera relative to the eyepiece to align the image as desired. |
| 3. | Prepare Micro-Trocar. |
| a. | Remove the Micro-Trocar and Access Sheath from their sterile package. |
| b. | Slide the Access Sheath onto the Micro-Trocar. Rotate Access Sheath on Micro-Trocar until Micro-Trocar Pin engages with Access Sheath allowing Access Sheath to lay flush against the Micro-Trocar (see Figure 1 ). |
| 4. | Prepare Inflation Device. |
| a. | Remove the Inflation Device from its sterile package. |
| b. | Turn the green lock mechanism counter clockwise to the unlocked position. |
| c. | Insert the extension tube into Sterile Saline Solution and pull back on the plunger handle to aspirate 15 – 20 cc. |
| d. | While holding the Inflation Device with the plunger handle down (so air accumulates by extension tube), advance the syringe plunger into the syringe barrel to purge air. Retain 8 – 10 cc of fluid in syringe barrel. |
Caution: Inspect the syringe tubing to ensure there is minimal air in the system.
| 5. | Prepare Balloon Catheter. |
| a. | Remove the Balloon Catheter from its sterile package. |
| b. | Connect the Inflation Device to the Balloon Catheter. |
| c. | While holding the Inflation Device with the plunger handle up, pull back on the plunger handle to apply a vacuum to the balloon. After air has been withdrawn from balloon into the syringe barrel, gently release the plunger handle to release vacuum. |
| d. | Lock Inflation Device by turning green lock mechanism clockwise to locked position. |
| e. | Remove the Protective Sleeve from the Balloon. Retain the Sleeve for balloon re-wrapping. |
| 1108-001-rG Oct 2010 | FINESS Sinus Treatment | Page 5 of 10 |
System Operation
| 1. | Patient preparation. |
| a. | Patient preparation should be consistent with standard practice. |
| b. | Anesthesia should be administered appropriately to allow patient tolerance. |
| 2. | Access Maxillary Sinus |
| a. | Firmly lift and retract lip to visualize gingival tissue and feel for canine fossa recess. |
| b. | While retracting lip to minimize gingival tissue thickness, enter tissue with Micro-Trocar. |
| c. | After accessing gingival tissue, position Micro-Trocar tip on bony surface at the intersection location described in Figure 6. |
| Note: | The target access location is typically on the lateral side of the canine fossa recess. |
| Note: | Access location may be confirmed by gently angling the Micro-Trocar to be perpendicular to the facial plane while holding the Micro-Trocar tip on the bone at the target access location. |
| d. | While holding Micro-Trocar at appropriate angle (approximately 45 degrees from the facial plane with the Micro-Trocar tip pointed at the inside corner of the eye}, apply a back-and-forth rotational motion (versus a pushing motion) to gently create an access hole. |
| Note: | Do not apply excessive penetration force when making access hole. |
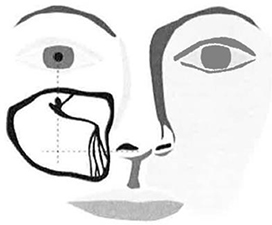
Figure 5 –Target Access Site Location
| e. | After sinus access is achieved, continue rotating Micro-Trocar with back-and-forth motion while gently angling the Micro-Trocar tip toward the Maxillary Sinus Ostium (corner of the eye). The gentle side-cutting motion provides a range of motion for the Cannula to visualize the Sinus Ostium. |
| Note: | The Micro-Trocar must be rotated with a back-and-forth motion prior to angling the Micro-Trocar. |
| Note: | The Micro-Trocar Pin must be engaged with the Access Sheath to allow side-cutting. If Pin pulls out of Access Sheath, re-insert and continue Micro-Trocar rotations. |
| 1108-001-rG Oct 2010 | FINESS Sinus Treatment | Page 6 of 10 |
| f. | While holding Access Sheath in access site, slide the Micro-Trocar out of the Access Sheath. |
| Note: | If Access Sheath slips out of access site (even if it Is just removed from the hole in the bone) at any time, re-load Access Sheath onto Micro-Trocar and use Micro-Trocar to locate original hole, or to re-access in a secondary location. Do not attempt to re-access the hole with the Access Sheath only. Access Sheath damage may occur. |
| g. | Use a standard #5 suction tip to aspirate fluid from the access sheath as required. |
| 3. | Insert Cannula into Access Sheath under endoscopic visualization. |
| Note: | The Cannula should be inserted up to the Cannula Shaft Mark (see Figure 2) to ensure the Cannula passes completely through the Access Sheath. Failure to accurately position the Cannula Shaft Mark may result in balloon damage. |
| Note | At any time during the procedure, the Cannula may be removed from the Access Sheath to clean the Endoscope by gently pulling the Cannula tip I Endoscope tip across a surgical wipe soaked in an appropriate cleaning medium. |
| 4. | Visualize presence of air / fluid level within sinus. |
| a. | If fluid level impedes endoscopic visualization, aspiration and/or irrigation may be required. |
| b. | Remove Cannula from Access Sheath to complete aspiration and/or irrigation. |
| c. | Insert Cannula into Access Sheath. Verify acceptable fluid level. Excess residual saline in the sinus should be gently aspirated through a standard #5 suction device. |
| 5. | Visualize the maxillary sinus ostium. |
| a. | While holding the Access Sheath in the access site, gently manipulate the Cannula to visualize the maxillary sinus ostium. |
| b. | While visualizing the ostium, topical anesthetic may be sprayed through the Cannula for additional topical anesthesia as required. |
| Note: | Use suction to remove residual anesthetic from Cannula using a standard #5 tip as required. |
| 6. | Introduce the Balloon Catheter through the Cannula. |
| 7. | Advance the Balloon across the ostium under endoscopic visualization. |
| a. | When the Balloon Catheter tip is positioned just outside of the ostium, advance the balloon into the sinus ostium with the curved catheter tip pointed posterior / inferior. |
| Note: | The arrow on the Balloon Catheter hub indicates the direction of the tip curve. |
| b. | Using the Shaft Marker (see Figure 3) as a visual reference for the proximal balloon end, position the Balloon within the ostium / infundibulum. |
Note: The Balloon Catheter may be rotationally steered to allow full insertion of the balloon into the ostium and infundibulum.
| 8. | Inflate Balloon. |
| a. | Slowly turn the plunger handle clockwise to increase the pressure. Inflate balloon in 2 atm increments under endoscopic visualization. |
| Note: | Do not use air or any gaseous medium to inflate the balloon. |
| b. | Inflate sinus balloon until desired result is achieved. |
| Note: | Do not exceed the maximum pressure of 12 atm. |
| c. | After balloon dilation is complete, deflate the sinus balloon by turning the Inflation Device green lock mechanism to unlocked position and pulling back on the plunger handle to apply vacuum to the balloon |
| 1108-001-rG Oct 2010 | FINESS Sinus Treatment | Page 7 of 10 |
| d. | Lock Inflation Device by turning the green lock mechanism to locked position to maintain balloon vacuum. |
| e. | Verify the Cannula is inserted into the Access Sheath up to the Shaft Mark to ensure the Cannula tip is inserted beyond the Access Sheath. |
| f. | Withdraw balloon from Cannula under endoscopic visualization. |
| Note: | Rotating the Catheter as the Balloon begins to engage the Cannula will assist in balloon withdrawal. |
| 9. | Endoscopically observe balloon dilation result. |
| a. | If the maxillary sinus ostium has been adequately dilated, remove Cannula and Access Sheath from access site. |
| Note: | Adequate dilation can be visually confirmed by observing the balloon during inflation, visually verifying balloon positioning during inflation, and ensuring that the recommended inflation pressure is achieved. |
| b. | If additional balloon dilation is required, prepare Balloon Catheter per step 10 and repeat steps for Balloon inflation. |
| 10. | Prepare Balloon Catheter for additional dilations (if required). |
| a. | Turn the Inflation Device green lock mechanism to unlocked position to release balloon vacuum. |
| b. | Gently advance the plunger handle into the syringe barrel to expand the balloon using minimal pressure. |
| c. | Rinse balloon with sterile saline or water. |
| d. | Wipe balloon dry using gauze pad. |
| e. | Position three fingers equally spaced on the balloon to serve as tri-fold guides. Ensure Inflation Device is unlocked then gently squeeze the balloon to force fluid into syringe barrel and tri-fold balloon. |
| f. | Gently pull back on the plunger handle about 2 – 4 cc to apply vacuum to the balloon. After fluid has been withdrawn from balloon, turn the Inflation Device green lock mechanism to locked position. |
| g. | Re-wrap the tri-folded balloon by gently folding the wings around the catheter shaft in a clockwise direction. |
| h. | Slide the Protective Sleeve on the re-wrapped balloon to restore original balloon profile. |
| i. | Before additional balloon dilatation, remove the Protective Sleeve from the Balloon. Retain the Sleeve for Balloon re-wrapping. |
| 11. | Repeat procedure for contralateral maxillary sinus if needed. |
| Note: | The scope image may need to be re-aligned prior to viewing second side. While holding the Cannula with the Endoscope Retention Valve positioned down (see Figure 2), rotate the Camera relative to the eye piece to align the image as desired. |
| 12. | After completing the entire procedure, withdraw all system components and discard. |
| 1108-001-rG Oct 2010 | FINESS Sinus Treatment | Page 8 of 10 |
Limited Warranty
Entellus Medical, Inc. warrants that reasonable care has been used in the design and manufacture of the FinESS Sinus Treatment system. This limited warranty is in lieu of and excludes all other warranties not expressly set forth herein, whether expressed or implied, written or oral, by operation of law or otherwise including, but not limited to, any implied warranties of merchantability or fitness for a particular purpose, or warranties arising from a course of dealing or usage or trade. Handling, storage, cleaning and sterilization of the FinESS Sinus Treatment system, as well as other factors relating to the patient, diagnosis, treatment, medical procedures, and other matters beyond Entellus Medical, Inc.’s control, directly affect the FinESS Sinus Treatment system and the results obtained from its use. This limited warranty does not extend to any abuse or misuse of the FinESS Sinus Treatment system (including, without limitation, off-label use), accident to or neglect of the FinESS Sinus Treatment system, failure to follow any instructions or specifications provided with the FinESS Sinus Treatment system (including, without limitation, any re-use, re-processing or re-sterilization of the FinESS Sinus Treatment system not in accordance with such instructions or specifications), in each case whether caused or carried out by Customer or by any third party.
Entellus Medical’s obligation under this limited warranty is limited, at Entellus Medical, Inc.’s option, to the repair or replacement of the FinESS Sinus Treatment system for a period of twelve (12) months from the date of purchase (the “Warranty Period”) using commercially reasonable efforts within a reasonable period of time. Entellus Medical, Inc. shall not be liable for any incidental or consequential loss, damage or expense directly or indirectly arising from use of the FinESS Sinus Treatment system. Repair or replacement of the FinESS Sinus Treatment system shall not extend the term of any applicable warranty and the original term of such warranty shall remain in effect. Repairs, modifications or alterations of the FinESS Sinus Treatment system performed by any person or entity other than Entellus Medical, Inc. or approved by Entellus Medical, Inc. in writing shall nullify and otherwise void all applicable warranties hereunder.
Entellus Medical, Inc. shall be obligated to honor the express limited warranties contained herein only upon receipt of full payment for the FinESS Sinus Treatment system or otherwise in accordance with the payment terms agreed to by Entellus Medical, Inc. and Customer.
Entellus Medical, Inc. neither assumes, nor authorizes any other person to assume for it, any other or additional liability or responsibility in connection with the FinESS Sinus Treatment system.
Limitation of Liability
In no event will either Entellus Medical, Inc. or Customer be liable to the other or to any third party for loss of profit, goodwill or other indirect, incidental, special or consequential or other similar damages arising out of these Terms and Conditions or any Related Purchase Document. The limitation of liability described in this section is in addition to any limitation provided for by the Limited Warranty provisions.
| 1108-001-rG Oct 2010 | FINESS Sinus Treatment | Page 9 of 10 |
Symbols
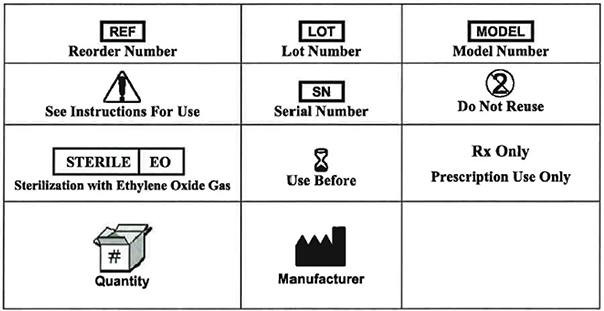
This product is protected by US Patent No. 7,520,876. Other US Patents Pending.
©2009 Entellus Medical. All rights reserved. FinESS is a trademark of Entellus Medical.

| 1108-001-rG Oct 2010 | FINESS Sinus Treatment | Page 10 of 10 |